Written by —
Written by —
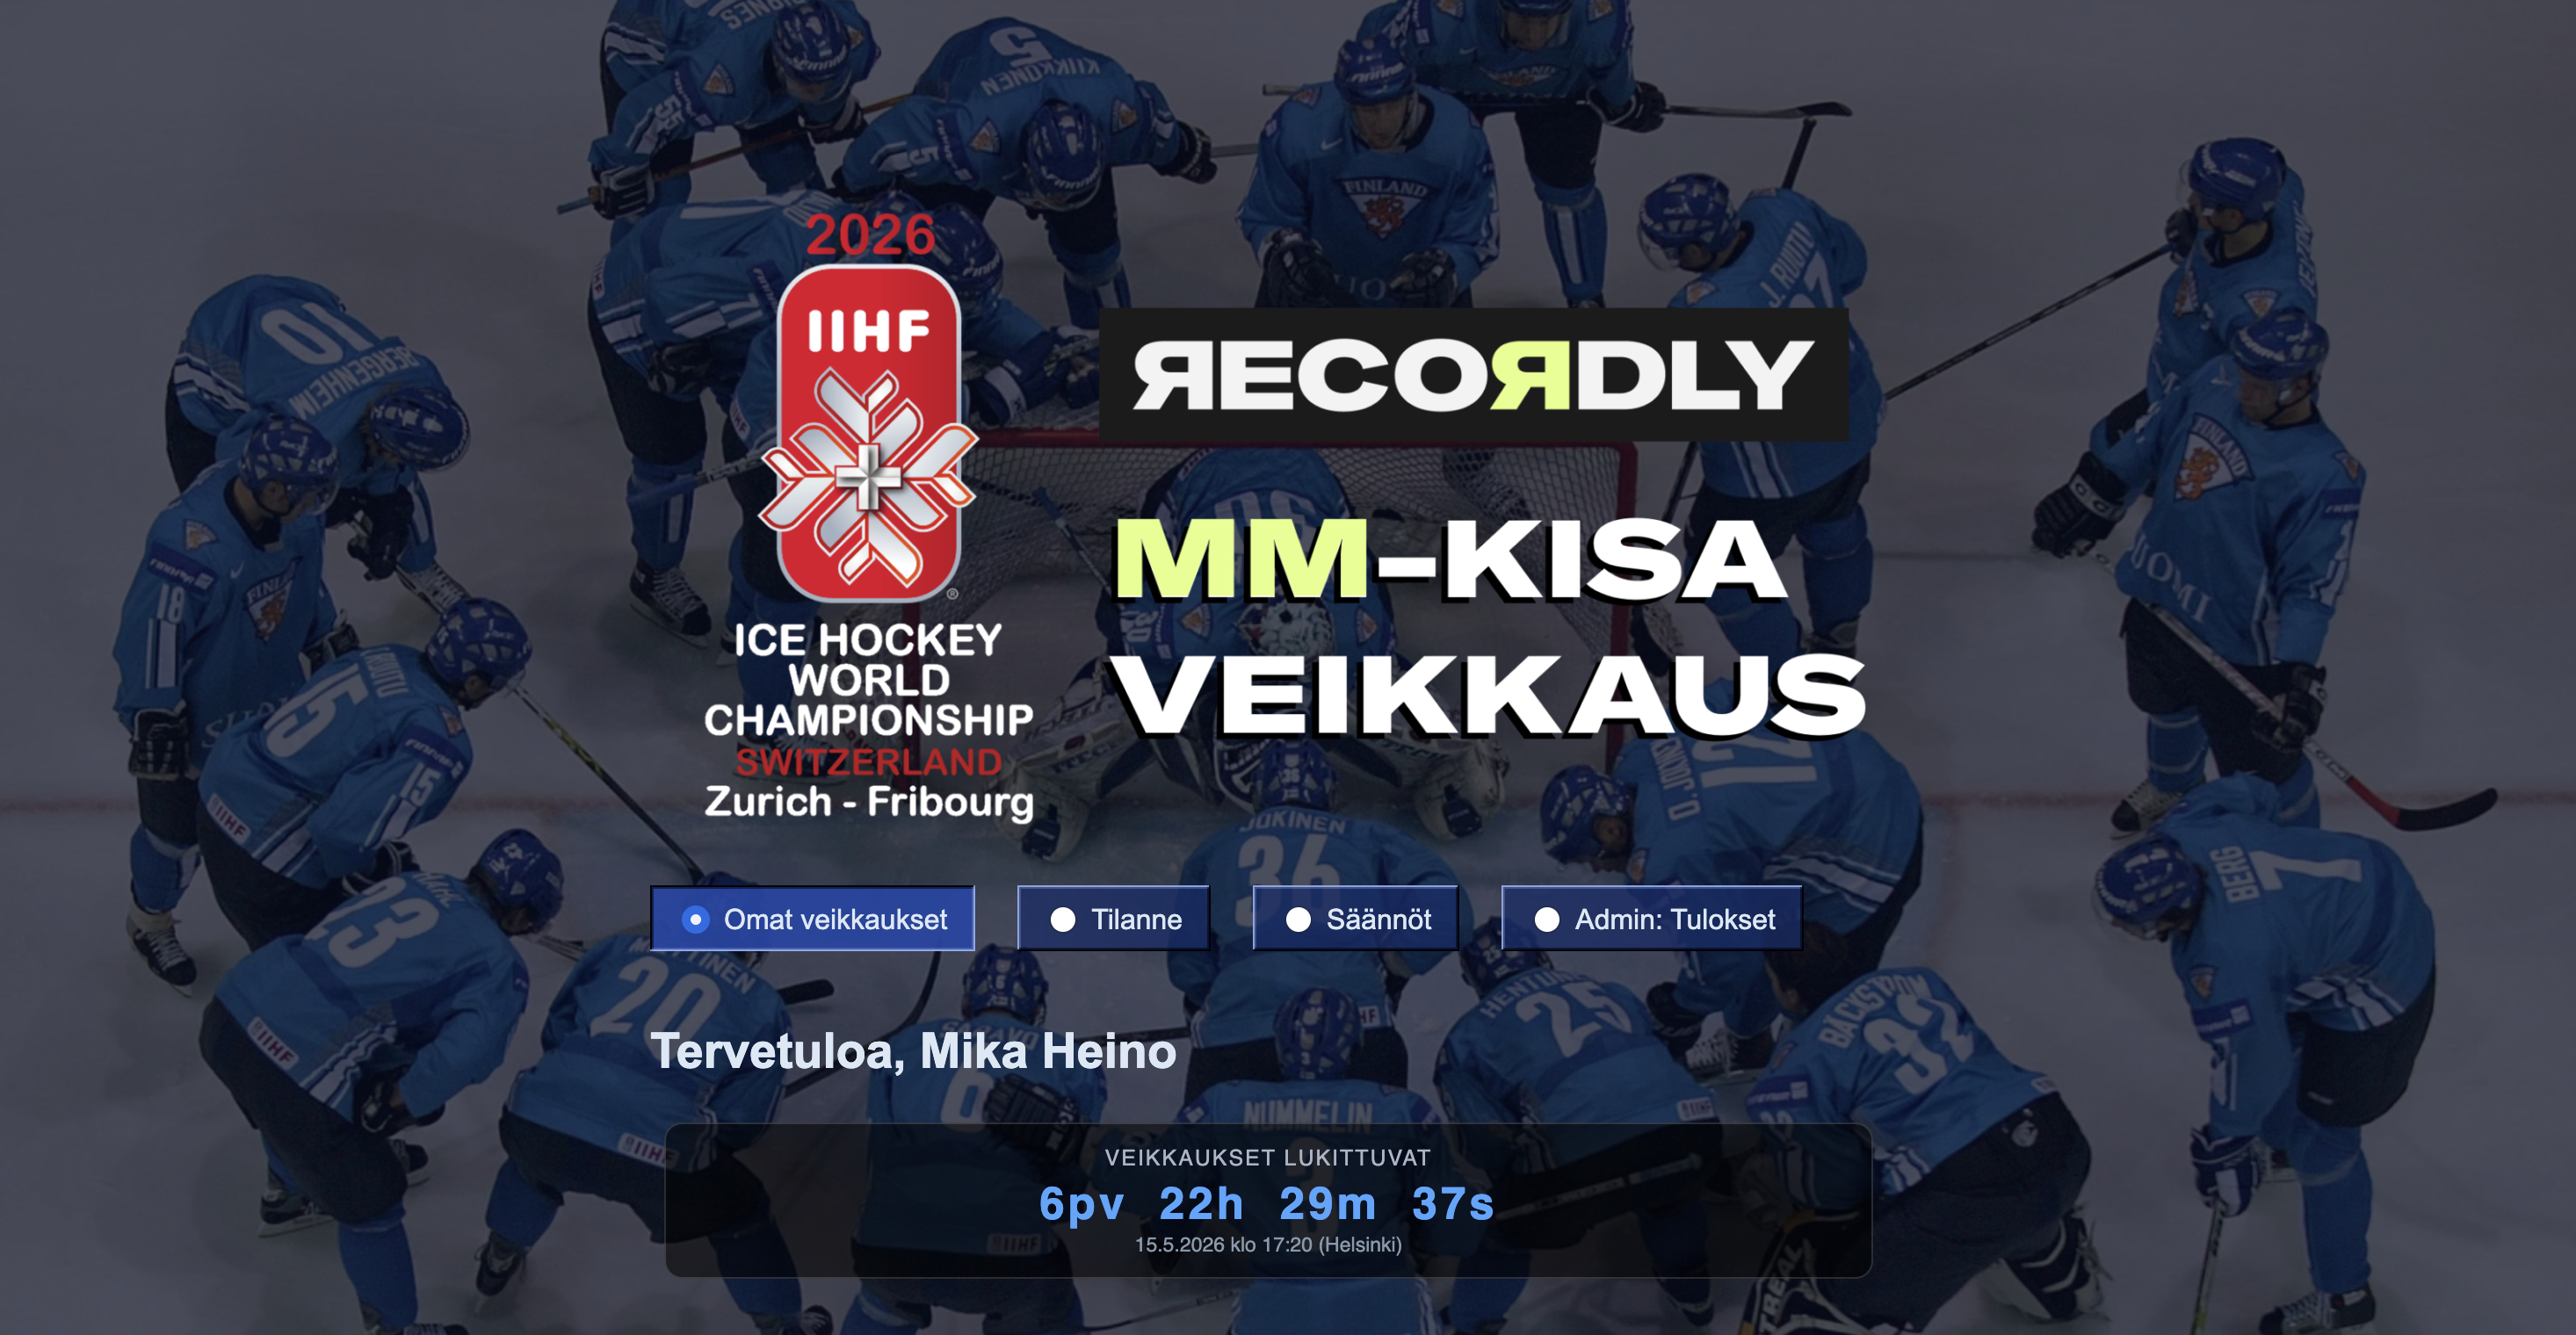
I play hockey predictions now and then, Liigapörssi during the Liiga season, mostly and every now and then I'll run a prediction pool for the IIHF World Championship if enough colleagues are up for it. Pick scorelines for all 56 group stage matches, watch the leaderboard shift as games play out, low stakes, mostly bragging rights.
I built the first version of the app in 2023 by hand on Streamlit Cloud when I was exploring then new editable data frames. The whole application built took a bout 30 hours of work. For the 2026 tournament held in Zurich and Fribourg, with Switzerland hosting on home ice I rebuilt the whole thing as a Streamlit in Snowflake (SiS) app on the warehouse runtime, using Snowflake Cortex Code CLI. Total credit spend: $160.
I knew Streamlit much better in 2026 than in 2023. The manual route should have been faster this time too. The agent-assisted build still won and it wasn't really a contest. The main reason is that I now understand more of what a real app needs beyond the happy path. Concurrency. Caching. Custom CSS so the UI doesn't look like every other Streamlit app. Real attention to visualization. Three years ago I'd have shipped without most of that and called it done. This time I wanted it right, and an agent that iterates on a layout twenty times in twenty minutes makes that affordable.
That said, $160 is not nothing. What kept it from being multiples of that was setup and how I drove the CLI. For that, I have listed my observations below on how I created the Streamlit application below to work smoothly inside Snowflake.
Final application
TIP 01 - Start with an AGENTS.md
AGENTS.md is a Markdown file at the project root that AI coding agents read at session start and treat as standing instructions. It's not a Cortex Code invention, it's a cross-tool convention used by Cursor, Claude Code, Copilot, and others. The same file usually works across whichever agent you're using.
Every assumption you bake in here is one the agent doesn't have to ask, guess, or get wrong. It's the highest-leverage thing you can do to keep credit spend down.
The single most important thing to pin down for a SiS project is the runtime environment. SiS has two:
- Warehouse runtime: personal instance per viewer, Streamlit 1.22+ (limited selection), Python 3.9/3.10/3.11, packages from Snowflake's Conda channel via
environment.yml, no cross-session caching. - Container runtime: shared instance, Streamlit 1.50+ (any version, including nightly builds), Python 3.11 only, packages from PyPI via
pyproject.tomlorrequirements.txt, full caching support.
These choices cascade into everything, which APIs work, which @st.cache_* decorators are available, how dependencies get declared, and even where the entrypoint file can live. Snowflake's runtime environments comparison has the full matrix.
Tell the agent which runtime you're targeting. Pin the Streamlit version too. Otherwise it'll write code for the newest Streamlit it knows about, things break on deploy, and you'll burn credits debugging a one-line problem.
A solid structure to start from:
# Project Overview (Brief description of purpose and architecture.) # Directory Structure (Key directories and the role each one plays.) # Tech Stack (Languages, frameworks, tools — and exact versions where they matter. For SiS, always specify the runtime (container vs. warehouse) and pin the Streamlit version.) # Coding Standards (Do) (Style guide, naming conventions, comment policy, where business logic lives vs. presentation.) # Don'ts (Secrets handling, destructive SQL prohibition, production access ban, no inventing column names without inspecting schema first.) # Snowflake-Specific Settings (Connection name, default warehouse and role, target database/schema, object naming conventions.) # Testing & Quality (Test command, lint command, format command, CI/CD notes.) # Custom Skills & SubAgents Guide (Names and purposes of custom skills or subagents the project uses.) |
A few things to keep in mind when writing one:
- Keep it short. Too many rules dilute compliance.
- Use explicit Do / Don't sections — separation beats prose.
- Include the directory structure so the agent puts files in the right place.
- List your custom skills and subagents — names, purpose, when to invoke.
TIP 02 - Use the built-in skills
Cortex Code ships with built-in skills that auto-activate when your prompt matches their domain. The library started Snowflake-focused (Dynamic Tables, Iceberg, Cortex AI Functions, governance, cost) and has expanded across the data stack. It now covers AWS Glue, Databricks, and PostgreSQL too, so you can drive work against non-Snowflake systems without migrating data first. Recent additions worth knowing: snowpark-python, snowpark-connect, dbt-projects-on-snowflake, dcm.
For SiS, the one to know is developing-with-streamlit-python. It auto-activates on Streamlit-shaped prompts and brings subskills covering deployment, secrets, layout, and performance. A surprising amount of "Cortex Code just knew what to do" was this skill running in the background.
A few things worth knowing:
- Run
cortex skill listbefore you start. Re-check periodically — the list keeps growing. - Force a specific skill with $
skill-name,, e.g.$$sdeveloping-with-streamlit add multi-page navigation. - Reference skills you rely on in
AGENTS.md - Write your own when you find yourself repeating the same setup instructions.
Example: a custom naming-standard skill
I use a strict prefix convention for Snowflake objects so I can tell what something is just by looking at it. Save the following as .cortex/skills/snowflake-naming-standard/SKILL.md or trigger the creation inside Cortex Code CLI by saying create a skill
|
A few things this example shows:
- The
descriptionfield drives auto-activation. Write it so the agent knows when to reach for the skill. - Tables beat prose. Structured rules get followed more reliably than narrative ones.
- The "STOP and ask" rule prevents invented prefixes. You get a clarifying question instead of inconsistency in production.
- Link to it from
AGENTS.mdunder Custom Skills & SubAgents Guide.
This is the kind of skill that pays for itself fast. Object names are exactly the sort of thing the agent gets almost right without explicit guidance close enough to look fine, wrong enough to cause friction six months later when someone runs SHOW WAREHOUSES and finds three different naming patterns.
TIP 03 - Run subagents in parallel
Subagents are independent agent instances that run alongside the main session. Each has its own context, its own tools, and (optionally) its own model. They're the answer to "the agent is busy doing X, but I want it to also do Y" — instead of waiting in serial, you delegate Y to a subagent and keep working.
Cortex Code ships with built-in subagent types (general-purpose, explore, plan, feedback) and lets you define your own. Three ways to invoke one:
- Auto-delegation: just ask. "Search every test file under
/src" lets the main agent decide it should hand the task off. - Explicit invocation: name the subagent. "Use the Explore agent to find all SQL files referencing
predictions." - Parallel execution: ask for multiple things at once. "In parallel, search for caching patterns and check the requirements.txt for missing pins." Cortex Code spins up subagents in parallel rather than serializing.
I used subagents most when working on the front end. While I was iterating on CSS and visualization in the main session - fast feedback loop, lots of "try this, no try that" - I'd dispatch a subagent to handle data work in the background: pulling fixtures, validating the schema against the leaderboard logic, sanity-checking that scoring math worked for edge cases. The CSS and the data investigation moved in parallel, which is something a single agent session can't do.
A few things worth knowing:
- Type
/agents(or Ctrl-B) to see what's running, get output, kill, or resume. - Custom subagents can specify their own model. A reviewer subagent on a different model family (e.g.
openai-gpt-5.2while the main session runs Claude) catches blind spots same-family review tends to miss. - Worktree isolation lets a subagent work in an isolated git branch — useful when you want it to refactor without stepping on your main edits.
Subagents are the feature most likely to change how you work with the CLI rather than what you can do with it. Worth experimenting with early.
TIP 04 - Wire up hooks for the things you'd forget
Hooks fire shell commands or LLM prompts on specific lifecycle events, before a tool runs, after the agent finishes a response, when it asks you for input, when a session starts or ends. They're the enforcement layer that sits underneath AGENTS.md. Where AGENTS.md says "the agent should run tests before declaring done," a hook makes it happen.
The eleven events Cortex Code exposes break down into three categories:
- Gates (
PreToolUse, PermissionRequest) — can block the agent. Use these to enforce hard rules: noDROP TABLEoutside a sandbox, no writes to production schemas. - Reactions (
PostToolUse, Stop, SubagentStop) — fire after something happens. Use these to run tests, lint, push notifications, or quality checks. - Signals (
UserPromptSubmit, SessionStart, Notification) — observe without intervening. Useful for logging or surfacing state.
Example: Playwright tests after UI edits
Playwright is an open-source browser automation framework. It scripts a real browser to click, type, and assert against a running web app, which makes it ideal for end-to-end UI testing.
A pattern worth setting up early on a Streamlit project: run a Playwright smoke test against the app every time the agent edits or writes a UI file. If the test fails, the hook returns a non-zero exit code and the agent goes back to fix it instead of declaring done.
Configured in .cortex/settings.json:
|
The matcher field is a regex against the tool name. "Edit|Write" means the hook only fires after the agent uses the Edit or Write tools — not after every response, not after a Read, not after a search. That's the first filter.
The script (playwright_smoke.sh) starts the app locally with streamlit run streamlit_app.py rather than redeploying to SiS — same engine, instant startup, no compute pool needed, no credits burned per test cycle. It waits for the dev server to come up, runs npx playwright test tests/smoke.spec.ts against localhost, and exits 2 with a useful stderr message if anything fails. The agent reads the stderr and keeps working.
The trick that makes this clean is using st.connection("snowflake") as your single connection interface - locally it reads .streamlit/secrets.toml, in SiS it picks up the session context automatically, and the same code path works in both. That means a smoke test that passes locally is testing the same code that ships to SiS. Things that won't match (real RBAC, viewer-specific session info, container-runtime-only behavior) need a separate test layer, but for "does the page render, does the form submit, does the leaderboard load" - local is plenty.
Two layers of filtering
The matcher narrows by tool name, but the agent edits all kinds of files — README updates, dependency bumps, the AGENTS.md itself — and you don't want to spin up Streamlit for any of those. So the script adds a second filter: it inspects the JSON it receives on stdin and exits early if the edited file isn't actually a UI file.
#!/bin/bash
|
So: the matcher gets you "only after Edit or Write," and the script narrows further to "only after Edit or Write to a Python or CSS file under app
A few more things to know if you go this route:
- Stop hooks need infinite-loop protection. If you also wire up a
Stophook that can block (exit 2), the agent continues working and theStopevent fires again. Always pass through withexit 0ifstop_hook_activeistruein theJSONstdin. - Keep hook timeouts realistic. Playwright tests take time. The default timeout will cut you off mid-test if you don't bump it.
- Combine with Snowflake governance. A
PreToolUsehook that blocksDROPagainst production is a belt;RBACrestricting your dev role from production is suspenders. Use both. - Notification hooks are underrated. A Slack ping when the agent is waiting for input means you can run long sessions in the background without missing a turn.
TIP 05 - Use /plan for anything non-trivial
/plan puts the agent into a mode where it lays out the full set of steps it intends to take and waits for your approval before doing anything. Schema changes, permission grants, multi-file refactors, anything where "agent does the wrong thing" is more than a minor inconvenience — /plan should be the default.
Two reasons it earns its place:
- You catch bad assumptions early. The agent's plan often reveals it misread the task or grabbed the wrong file. Easier to fix in the plan than after the agent has touched ten files.
- The plan itself is useful documentation. What the agent thought it was doing, in its own words, is a record you can paste into a PR description or a runbook.
For day-to-day work I run /plan first on anything that touches more than one file or involves any CREATE/ALTER/DROP. The few seconds of review pay for themselves the first time the plan reveals the agent was about to do the wrong thing.
There's a complementary command, /bypass, that skips the per-action confirmation prompts during execution. It's tempting in a sandbox where mistakes don't matte, fast, no nagging, but I'd treat it as a sharp tool, not a best practice. The per-step prompts are the last check between "the agent thought about doing this" and "the agent did this," and plans don't always survive contact with execution. In a real account, leave the prompts on.
TIP 06 - Pick the model on purpose
The model you pick is the biggest lever on cost. A more capable model burns credits faster per turn but tends to one-shot problems that a cheaper model loops on. The "expensive" model often costs less in total — fewer retries, fewer wrong turns, less time unwinding bad suggestions.
Cortex Code currently supports:
| Model | Identifier |
|---|---|
| Auto | auto |
| Claude Opus 4.6 | claude-opus-4-6 |
| Claude Sonnet 4.6 | claude-sonnet-4-6 |
| Claude Opus 4.5 | claude-opus-4-5 |
| Claude Sonnet 4.5 | claude-sonnet-4-5 |
| Claude Sonnet 4.0 | claude-4-sonnet |
| OpenAI GPT 5.2 | openai-gpt-5.2 |
auto is a fine default and rolls forward as new models get added. But for tasks where one-shot quality matters — complex refactors, schema changes, gnarly debugging — name the strongest model your account has access to via /model claude-opus-4-6 rather than trusting auto to make the call. For routine work — file scaffolding, boilerplate, small refactors — drop to a smaller model explicitly.
If a model isn't available in your region, enable cross-region inference (AWS_US, AWS_EU, AWS_APJ, or ANY_REGION).
Cortex Code uses Snowflake AI credits, separate from compute credits, at roughly $2 per credit.
TIP 07 - Expect the migration tax
If you're moving an existing Streamlit Cloud app to SiS, most of your credits go to the migration and runtime configuration, not the new feature work.
Streamlit Cloud and SiS look similar but differ where it matters. Cloud uses your client libraries and credentials. SiS sessions are pre-authenticated, data sits next to compute, and read/write patterns differ. Code with connection objects, secrets, or file paths baked in needs untangling, not porting.
The container runtime adds another layer — dependencies, package versions, startup behavior. The agent handles this well, but it costs credits.
Do an AGENTS.md. pass before the migration starts to encode what you already know about both environments. It saves the agent from rediscovering each difference at your expense.
TIP 08 - Cortex Code is moving fast — check the changelog
Cortex Code ships updates frequently. Bookmark the changelog. Recent releases include browser workflows (cortex browser), Postgres connections, a plugin marketplace, agent-to-agent messaging, expanded Windows support, and faster guardrails.
I hit the browser capability mid-build. When I asked Cortex Code to fetch the IIHF group stage schedule, instead of refusing it opened a browser session, pulled the page, and parsed the fixtures. That feature didn't exist when I started planning the rebuild — it was there when I needed it. If I'd assumed the agent couldn't browse, I'd have curated the schedule by hand.
Don't assume Cortex Code can't do something just because it couldn't last month. Check the changelog when you start a project, and again when you hit a wall.
TIP 09 - Set the cost controls before you hand out access
Everything above this assumes the developer follows along. They won't always. Someone will run a long agentic loop with auto against claude-opus-4-6 on a Friday afternoon, walk away, and come back Monday to a credit bill that funds someone's holiday. The eight tips above keep your spend down. Cost controls keep your team's spend down when somebody on the team hasn't read the post.
LLMs are still new for most teams, and people are still figuring out where they bring real value and where they just burn credits. Guardrails are not a "no to AI" — they're putting the right limits in the right places.
Snowflake exposes two account-level parameters for Cortex Code:
CORTEX_CODE_CLI_DAILY_EST_CREDIT_LIMIT_PER_USER— daily estimated credit cap for CLI usage, per user, rolling 24-hour window.CORTEX_CODE_SNOWSIGHT_DAILY_EST_CREDIT_LIMIT_PER_USER— same idea, for Cortex Code in Snowsight.
Defaults are -1 (unlimited). Set to 0 to block a user entirely. Any positive number caps daily estimated usage. User-level settings override account-level. Requires ACCOUNTADMIN.
-- Sensible default for everyone
|
Guardrails alone aren't enough — you also need to see what's happening. Snowflake added two dedicated ACCOUNT_USAGE views for exactly this:
CORTEX_CODE_CLI_USAGE_HISTORYCORTEX_CODE_SNOWSIGHT_USAGE_HISTORY
Both keep 365 days of history with request-level usage and token-credit detail, which is what you want for building your own reporting on top. First put limits in place, then make sure you can track what's actually going through them.
One more thing: PAT restrictions are tightening in 10.15
If your team is wiring Cortex Code into CI or scripts using programmatic access tokens (PATs), the 10.15 release (preview, scheduled May 5) adds two new authentication policy properties worth knowing about before they catch you off guard.
Until now, role restrictions on PATs were really only enforceable on service users. A person user could generate a PAT that effectively acted with their full privileges, which is a gap that's easy to miss until it's the one that matters. The new properties close it:
REQUIRE_ROLE_RESTRICTION_FOR_PERSON_USERS— whenTRUE, person users must specify a role when generating a PAT. DefaultFALSE. Flip this on and developers can no longer generate wide-open person tokens by accident.BLOCKED_ROLES_LIST— prevents named roles from being used as a PAT role restriction at all. Obvious candidates:ACCOUNTADMIN,SYSADMIN. Important caveat: blocking a role also invalidates existing tokens restricted to that role. So this is a behavior change, not a forward-only setting. Audit before flipping.
Worth lining up your authentication policies and reviewing existing PATs scoped to admin roles before May 5.
Wrap-up time
The 2023 build took 30 hours. Even at a modest hourly rate, that's several times $160 of my time. The 2026 rebuild finished faster and produced a better app — Snowflake-native infrastructure, cleaner data flows, no separate hosting layer to babysit, and the kind of polish I wouldn't have bothered with on my own.
The honest comparison isn't "free vs. $160." It's "30 hours of focused work plus a worse result vs. a few hours of supervising an agent, $160 in credits, and an app I'm actually happy with."