Written by —
Written by —
Nowadays, all major cloud vendors from Azure and AWS to Google Cloud Platform (GCP) have their own solutions for developers to deploy machine learning solutions for their organizations. Here we focus on Google Cloud’s MLOps capabilities with Vertex AI through a simple demo.
Psst! If you want to deploy the model into an endpoint, you can find the source codes at the end 👀
What is it?
Vertex AI is Google’s one-stop-for-most machine learning toolset. When checking the Google cloud cheat sheet, Vertex AI represents roughly half of Google’s AI/ML offering. In addition, a large chunk of non-Vertex AI services can be integrated with Vertex AI or actually work as a part of the Vertex AI services under the hood.
Vertex AI consists of different services that, when combined together, form a complete machine learning platform that can be used to create ML solutions with the MLOps framework. Developers can pre-process the data and save it for consumption using managed datasets (for AutoML models) or the feature store. They can also leverage Vertex AI Workbench to quickly develop ML components, do experimentation and deploy a complete ML solution using Vertex AI Pipelines.
The incentive here is to share an example of how to create an end-to-end ML pipeline with Vertex AI Pipelines and Kubeflow. Sure, you can find a lot of stuff online but this should serve as a general and easy-to-follow demonstration that includes pipeline Python definitions, compiling, and deployment to Vertex AI Pipelines.
First, we take a quick peek into what MLOps and Kubeflow are and then go over a demo of how to get started with Vertex AI Pipelines. In the end, you will know how to build a simple pipeline that creates an XGBoost classification model and conforms to the MLOps framework covering the needed technologies to make it possible.
MLOps framework
MLOps is short for machine learning operations which takes into account the complete lifecycle and maintenance of a machine learning solution in a similar fashion as DevOps and DataOps do in their respective fields. The framework aims to deploy and maintain machine learning models in production with reliability and efficiency.
The basic phases of an MLOps lifecycle can be interpreted as follows:
- Data collection
- Pre-processing
- Feature/data engineering
- ML model development and training
- ML model testing and validation
- ML model deployment and prediction serving
- Model monitoring
Each of the phases is considered and defined independently but requires interconnectivity between each other. The key benefits of implementing MLOps in a project are increased automation, repeatability, and auditability of the solution itself through CI/CD as well as different defined stages of the lifecycle of the ML solution.
If you want to read more about MLOps, you can check out “What is MLOps and what can you do with it?” by Noora Raitanen
Kubeflow
Vertex AI Pipelines give developers two SDK choices to create the pipeline logic: Kubeflow Pipelines (referenced just as Kubeflow later) and Tensorflow Extended (TFX). If your use case doesn’t explicitly need TFX, Kubeflow is probably the better option of the two as Google suggests in its documentation. For the sake of this case, we’ll solely focus on Kubeflow since it is the recommended SDK.
Kubeflow itself is an open-source machine learning toolkit for Kubernetes. The primary goal of the Kubeflow project is to make deployments of machine learning workflows on Kubernetes simple, portable and scalable. Since Vertex AI Pipeline components are docker containers deployed on a Kubernetes cluster, the selection of Kubeflow is fairly straightforward.
The SDK version 2 is currently in the beta phase but should definitely be used. It provides a number of improvements such as a component decorator that can be used to define a Kubeflow python-based component in just a few lines of code and artifacts with ML metadata.
Since Kubeflow components are self-contained sets of code that perform one step in Vertex AI pipelines, the data for each step is passed by artifact references. The artifacts are stored in Google Cloud Storage and loaded into the container (pipeline tasks) during runtime.
Depending on the sensitivity and business requirements, GCS object lifecycle policies might be something to think of. Suppose the different artifacts, such as datasets, created during a Vertex AI Pipeline run are not something to be stored long-term. In that case, it is a good idea to automatically clean them after a week or two and store the relevant data in a separate, non-lifecycle policy-controlled bucket. Running the actual code in pipeline tasks also prevents you from implementing any custom logic for the pipeline level. You can’t run data transformations or loops (except by using the kfp.ParallelFor) in the top-level code. Instead, you have to deal with them within the tasks.
Now to the actual demo with Vertex AI Pipeline
The pipeline we’re going to create as a demo is fairly simple:
Pipeline task |
MLOps phase |
| Get data from the scikit-learn database | Data collection |
| Do some light pre-processing | Pre-processing & feature engineering |
| Train the ML model & evaluate its performance | ML model development & training |
| Validate the model | ML model validation |
| Create an endpoint & deploy the model into it | ML model deployment |
| Make predictions | Prediction serving |
There are multiple public datasets available for everyone online. We're going to use the KDD Cup '99 dataset in the scikit-learn library which contains portions of the 1998 DARPA Intrusion System with artificial attacks and create an XGBoost classification model to classify attacks.
Here’s the full pipeline configuration and a visual representation of it in Vertex AI Pipelines:
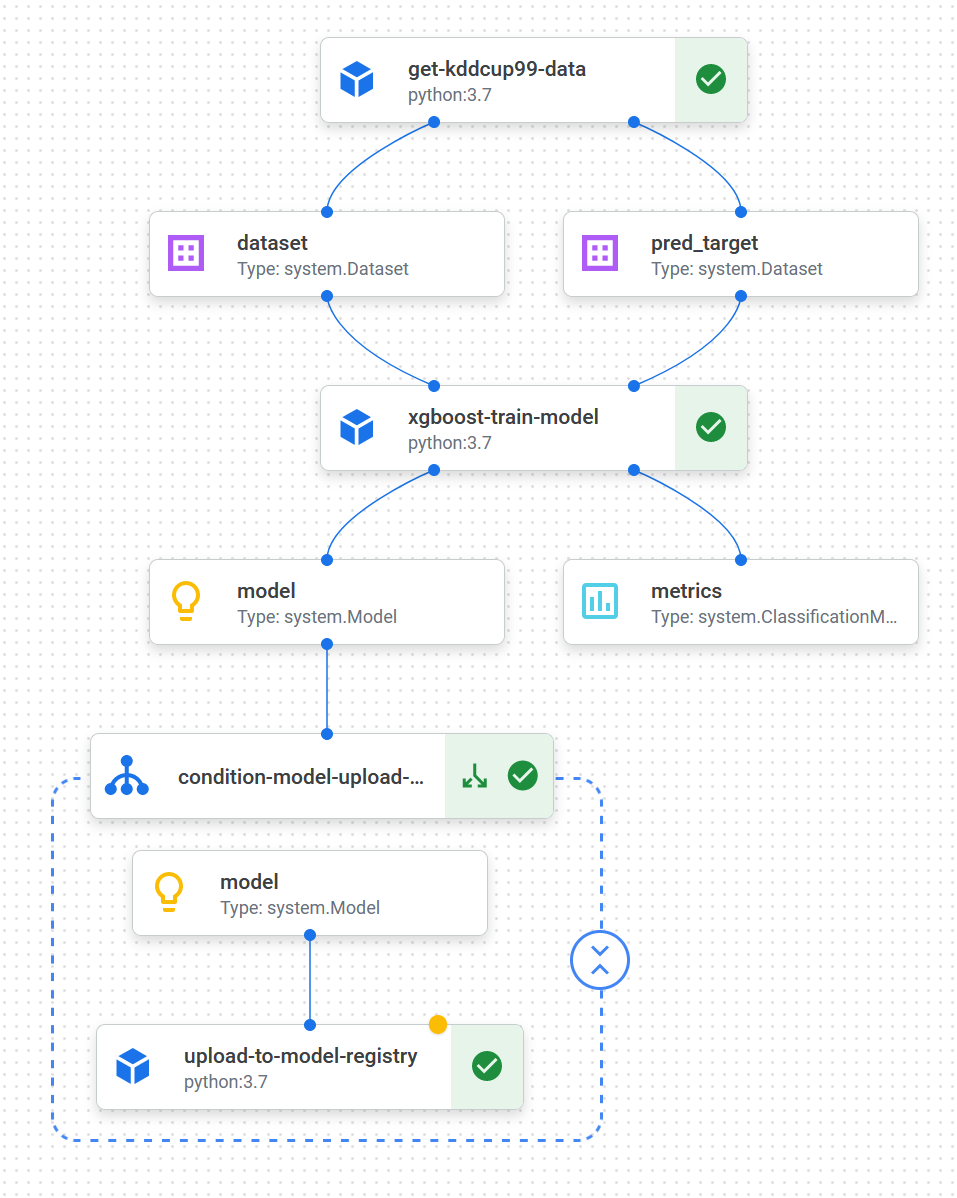
We configure the pipeline with custom python-based components using the Kubeflow Pipelines SDK v2. Since we’re not using AutoML solutions, the datasets are not stored as managed datasets but rather passed between components via GCS.
As you read along the different code snippets, take note of the following:
- The input and output specifications that are different types of artifacts:
InputPath(“Dataset”),OutputPath(“Dataset”)that are essentially GCS path references forInput[Dataset]andOutput[Dataset]Output[Model]which is a model artifactOutput[ClassificationMetrics]that is used to output a confusion matrix for the trained model@componentdecorators that are used to define python-based Kubeflow components. The decorators also list Python packages that are required to install when spinning up the container.@pipelinedecorator that’s used to define the actual Vertex AI Pipeline- The components’ code uses the default python logging interface which automatically outputs log messages to the Vertex AI Pipeline task logs. The logs are automatically stored in Google Logging.
Huge kudos to Rauno Paukkeri for the help in creating the ML model for this demo!
Data collection
You can access the KDD Cup ‘99 dataset by installing the scikit-learn Python library and loading the data from the library.
The first component is used to get the KDD Cup ‘99 data and do some light pre-processing on it:
- Remove target column from training data
- Form new columns and adjust data types
- Output the datasets (train + target data) to GCS
from kfp.v2.dsl import(
    component,
    OutputPath
)
@component(
    packages_to_install=[
        "pandas",
        "sklearn"
    ]
)
def get_kddcup99_data(
    dataset: OutputPath("Dataset"),
    pred_target: OutputPath("Dataset"),
) -> list:
    import pandas as pd
    import logging

    from sklearn.datasets import fetch_kddcup99

    logging.info("Get dataset KDD Cup 99 from sklearn")
    kddcup99_frame = fetch_kddcup99(as_frame=True)
    data = kddcup99_frame.frame
    target = kddcup99_frame.target

    logging.info("Remove the target column")
    data = data.drop("labels", axis=1)

    logging.info("Form new columns")
    cat_columns = ["protocol_type", "service", "flag"]
    num_columns = [
    	col for col in data.columns if col not in cat_columns
    ]

    logging.info("Adjust data types")
    data[cat_columns] = (
    	data[cat_columns]
        .apply(lambda x: pd.Categorical(x))
    )
    data[num_columns] = (
    	data[num_columns]
        .apply(lambda x: x.astype(float))
    )

    data.to_csv(dataset, index=False)
    target.to_csv(pred_target, index=False)

    return cat_columns
Pre-processing and ML model training
The next step is pre-processing the data and training the model. Usually, the pre-processing and model training could be split into two different tasks. However, since we’re using LabelEncoder to encode our data labels, we need to have the same instance of it running within the component to decode the prediction labels for the confusion matrix.
The component trains an XGBoost model for classifying the attack type from input data. The different labels are one-hot encoded since XGBoost needs numerical inputs rather than arbitrary strings for labels.
All the steps found in the code are:
- Read in the dataset artifacts produced by the previous step in the pipeline
- Encode target labels
- Split data into training, test, and validation sets
- Training data: used to train the ML model
- Validation data: used to evaluate the model fit on the training data while tuning the model’s hyperparameters
- Testing data: used to provide an unbiased evaluation of the final model fit
- One-hot encode and transform training data
- Train XGBoost classification model
- Create a confusion matrix and evaluation metrics for the model
from kfp.v2.dsl import (
    component,
    ClassificationMetrics,
    InputPath,
    Model,
    Output
)

@component(
    packages_to_install=[
        "numpy",
        "pandas",
        "sklearn",
        "xgboost"
    ]
)
def xgboost_train_model(
    train_dataset: InputPath("Dataset"),
    target_dataset: InputPath("Dataset"),
    cat_columns: list,
    model: Output[Model],
    metrics: Output[ClassificationMetrics],
) -> float:

    import numpy as np
    import pandas as pd
    import logging
    from datetime import datetime
    from sklearn import preprocessing
    from sklearn.compose import ColumnTransformer
    from sklearn.model_selection import train_test_split
    from sklearn.preprocessing import OneHotEncoder
    from sklearn.metrics import confusion_matrix, accuracy_score
    import xgboost as xgb

    logging.info("Read input data")
    X = pd.read_csv(train_dataset)
    target = pd.read_csv(target_dataset)

    logging.info("Encode target data")
    le = preprocessing.LabelEncoder()
    y = le.fit_transform(target)

    logging.info("Split data to training, testing and validation sets for X and Y")
    X_train, X_test, y_train, y_test = train_test_split(
        X, y, test_size=0.2, random_state=62
    )
    X_train, X_val, y_train, y_val = train_test_split(
        X_train, y_train, test_size=0.25, random_state=62
    )

    logging.info("One-hot encode")
    full_pipeline = ColumnTransformer(
        [("cat", OneHotEncoder(handle_unknown="ignore"), cat_columns)],
        remainder="passthrough",
    )

    encoder = full_pipeline.fit(X_train)
    X_train = encoder.transform(X_train)
    X_test = encoder.transform(X_test)
    X_val = encoder.transform(X_val)

    logging.info("Instantiate classifier and set run parameters")
    xgb_model = xgb.XGBClassifier(objective="multi:softprob", random_state=62, eval_metric=["merror", "mlogloss"])
    xgb_model.set_params(early_stopping_rounds=5)

    start_train = datetime.now()

    logging.info("Train model")
    xgb_model.fit(X_train, y_train, eval_set=[(X_val, y_val)])
    logging.info(
        f"best score: {xgb_model.best_score}, best iteration: {xgb_model.best_iteration}, best ntree limit {xgb_model.best_ntree_limit}"
    )

    end_train = datetime.now()

    logging.info("Get predictions for confusion matrix")
    y_pred = xgb_model.predict(X_test)

    logging.info("Get labels for CM output")
    y_pred_new = []
    for pred in y_pred:
        if pred in y_test:
            y_pred_new.append(pred)
        else:
            pass

    y_pred = np.array(y_pred_new)

    y_test_new = []
    for pred in y_test:
        if pred in y_pred:
            y_test_new.append(pred)
        else:
            pass
    y_test = np.array(y_test_new)

    cm_labels = [item.replace('.', '').replace('b\'', '').replace('\'', '') for item in np.unique(le.inverse_transform(y_test))]

    logging.info("Output confusion matrix")
    logging.info(f"CM Labels: {cm_labels}")
    metrics.log_confusion_matrix(
        cm_labels, # labels
        confusion_matrix(y_test, y_pred).tolist() # Convert nparray to list
    )

    logging.info("Calculate eval metrics")
    predictions = [round(value) for value in y_pred]
    accuracy = accuracy_score(y_test, predictions)

    model.metadata["accuracy"] = accuracy
    model.metadata["time_to_train_seconds"] = (end_train - start_train).total_seconds()
    model.path = model.path + '.bst'

    logging.info("Output model artifact to GCS")
    xgb_model.save_model(model.path)

    return accuracy
If the use case so requires, the model training data could be persisted into a BigQuery table or as files in long-term GCS storage. This would enable developers to view the user data for training in the future which could be used to check the model training history and the parameters used for each training cycle.
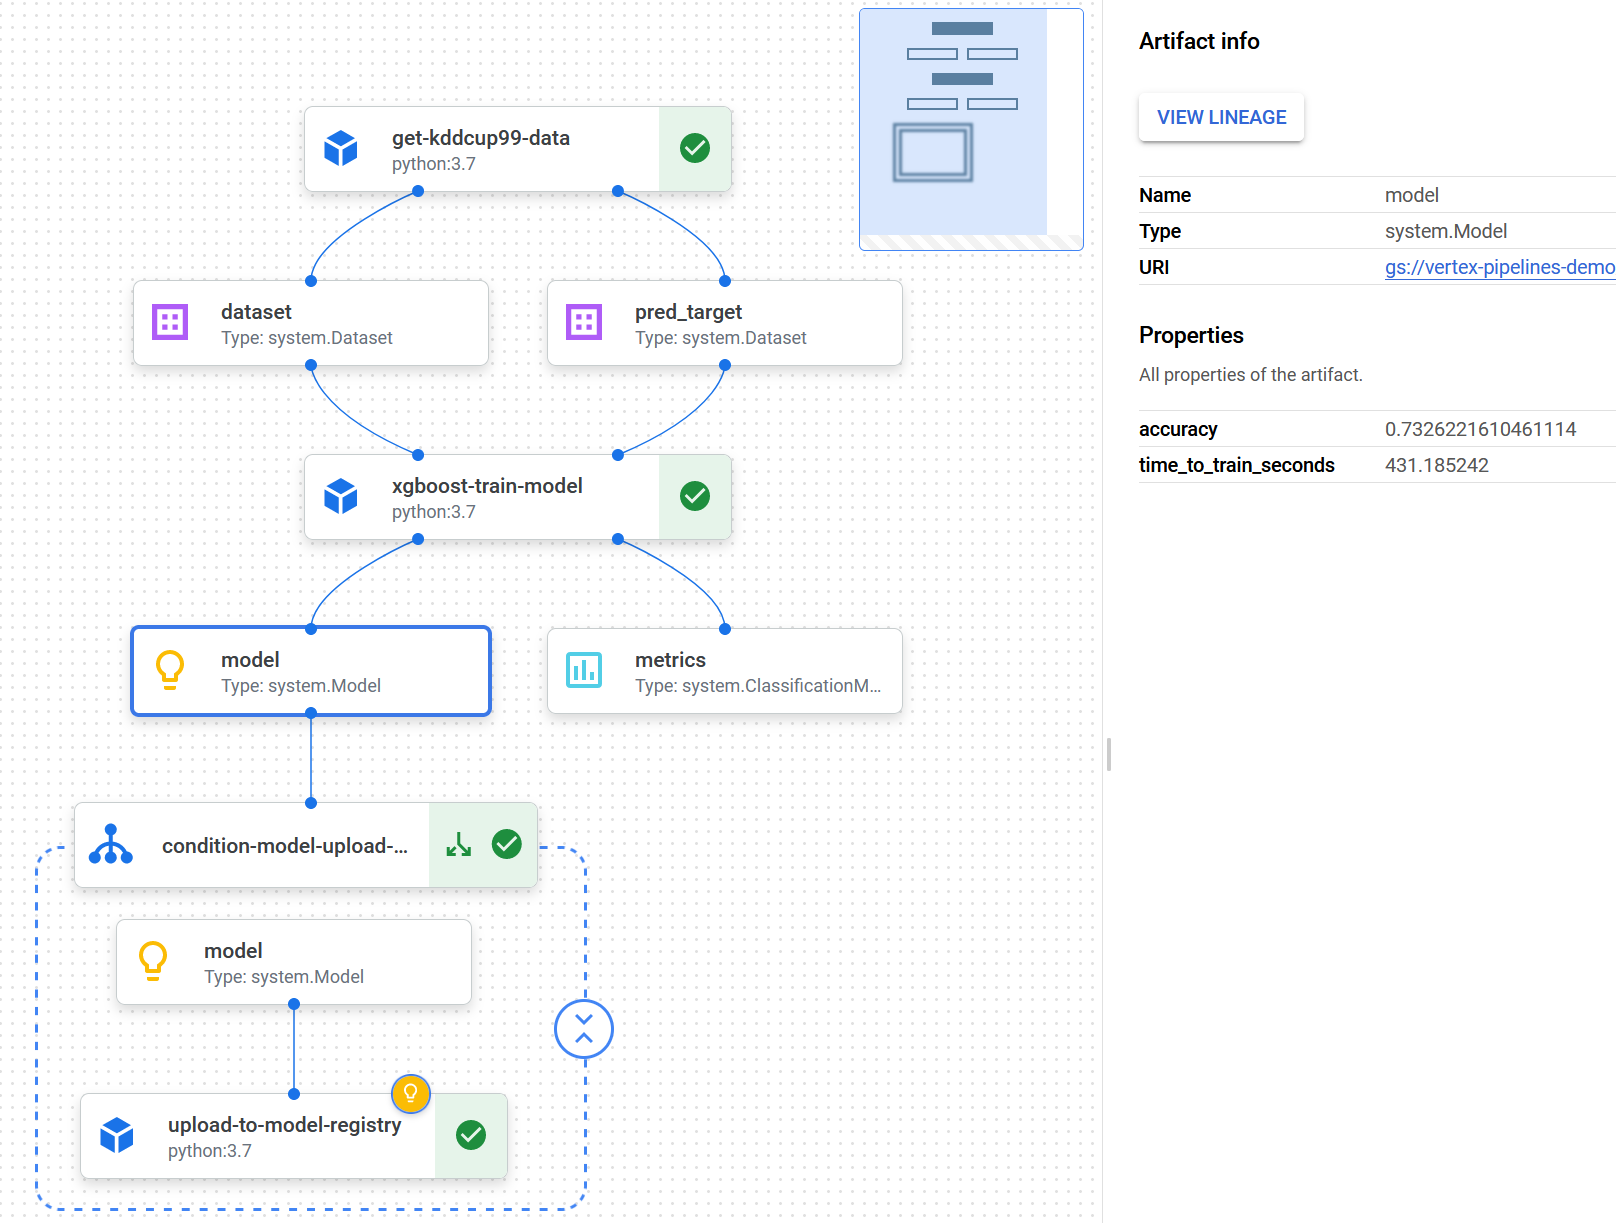
To evaluate the model later in the pipeline, a confusion matrix and accuracy score are outputted for the model. You can view the accuracy score by selecting the model component in the Vertex AI pipeline UI and checking the artifact information.
By selecting the metrics component, you can see the plotted confusion matrix. However, when writing this piece, the Vertex AI pipeline UI has a bug: the UI can show only a maximum of 10 labels in the confusion matrix. You can see the whole confusion matrix data by downloading it as CSV from the UI. You can also switch the CM to show percentage or absolute values with a switch in the UI.
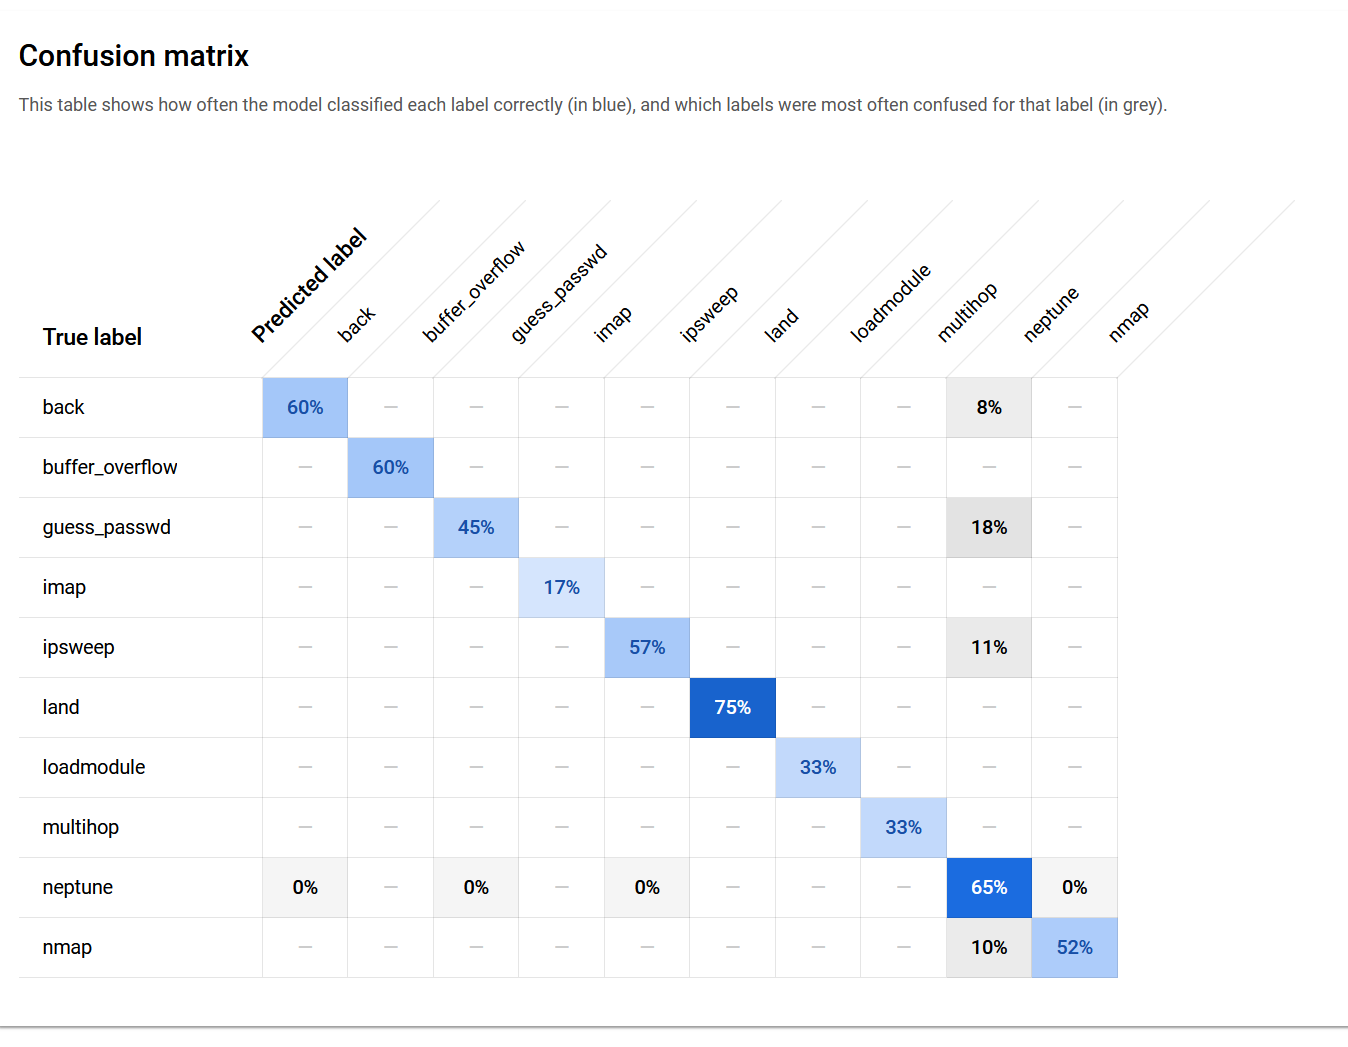
Here’s how the CM looks when fully plotted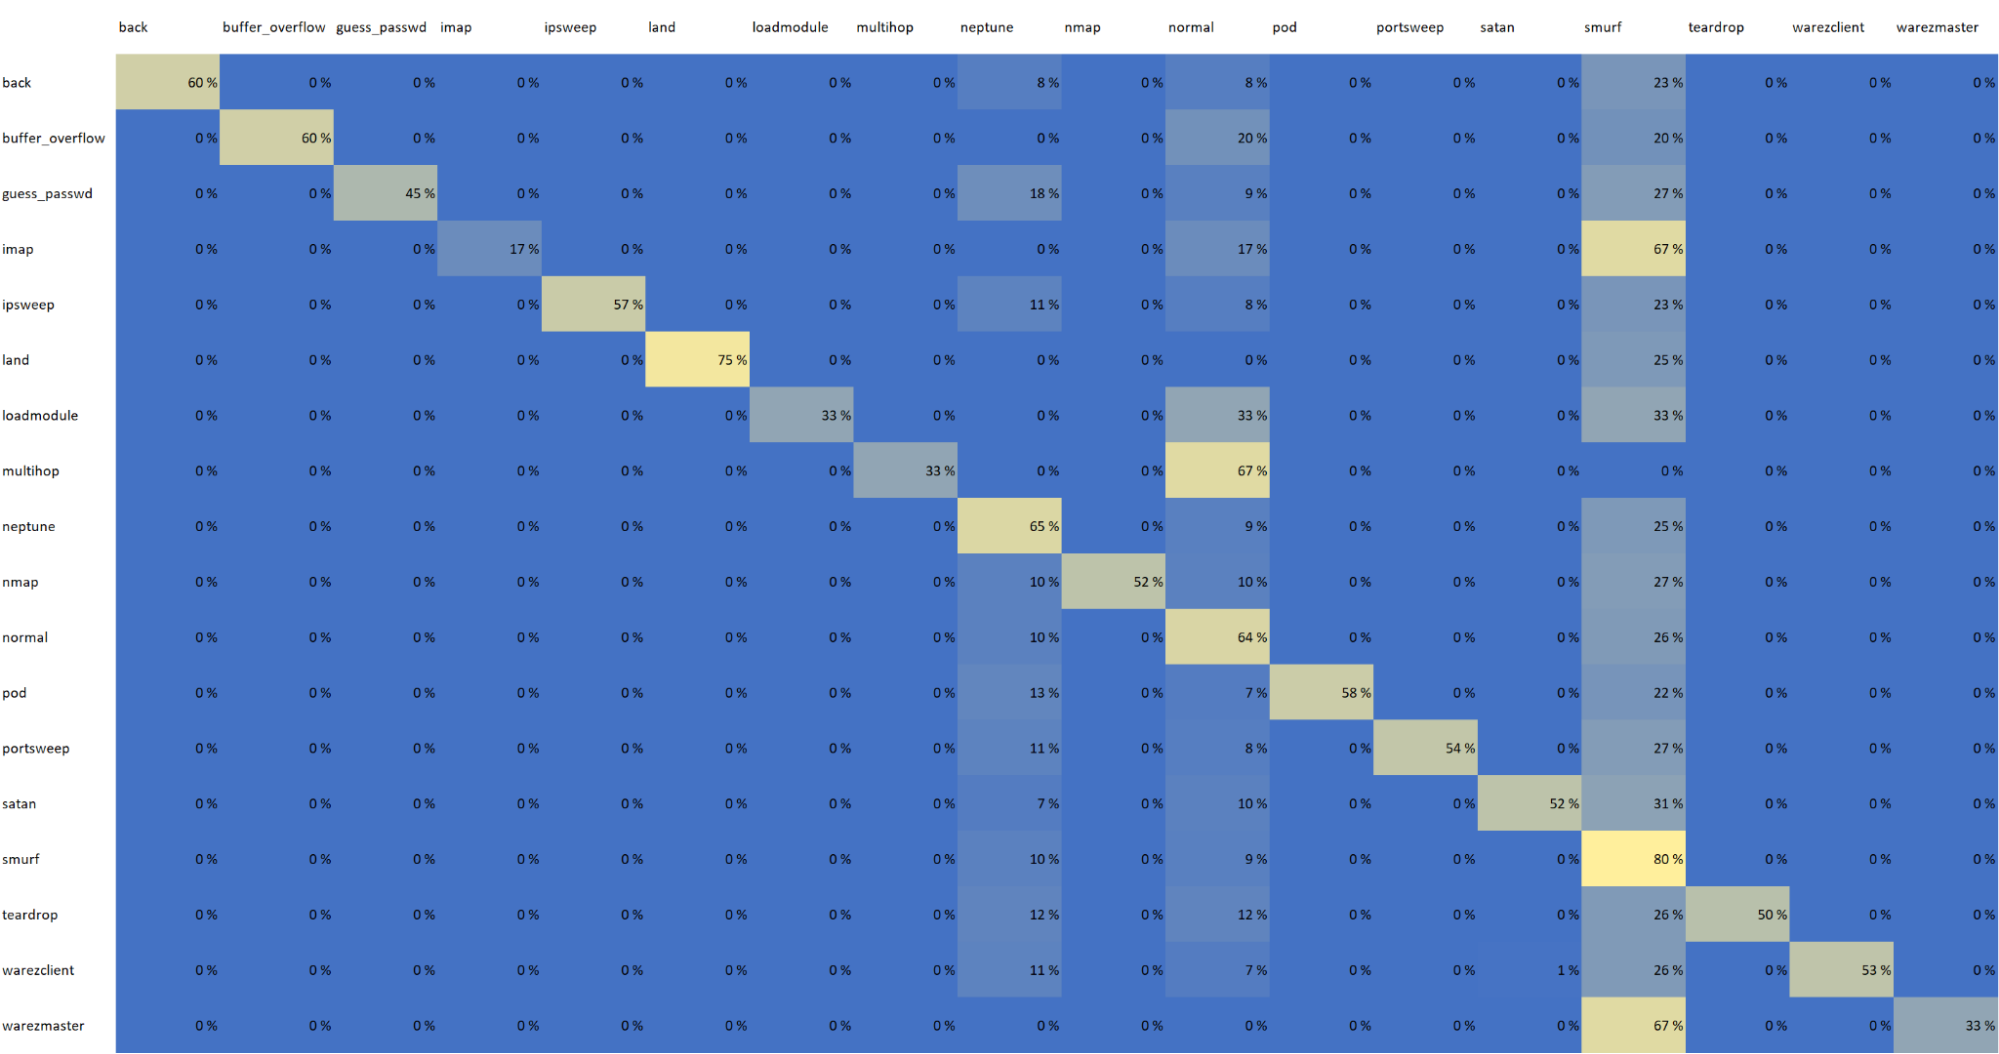
ML model validation and upload to the model registry
When an ML model is trained, it should be deployed only if it performs well enough. The pipeline has a condition checking the model’s accuracy. If accuracy > 0.7, the model is considered good enough for deployment. The condition definition can be found in the pipeline specification shown later.
When the model passes validation of having an accuracy score > 0.7, we upload it to the Vertex AI Model registry for deployment. The Vertex AI Model Registry is a searchable repository where you can manage the lifecycle of your ML models. You have an overview of the models so they can be organized, tracked, and versioned.
from typing import Dict, Optional, Sequence
from kfp.v2.dsl import (
    component,
    ClassificationMetrics,
    InputPath,
    Model,
    Input,
    Output
)

@component(
    packages_to_install=[
        "google-cloud-aiplatform",
    ]
)
def upload_to_model_registry(
    project: str,
    location: str,
    display_name: str,
    serving_container_image_uri: str,
    input_model: Input[Model],
    serving_container_predict_route: Optional[str] = None,
    serving_container_health_route: Optional[str] = None,
    description: Optional[str] = None,
    serving_container_command: Optional[Sequence[str]] = None,
    serving_container_args: Optional[Sequence[str]] = None,
    serving_container_environment_variables: Optional[Dict[str, str]] = None,
    serving_container_ports: Optional[Sequence[int]] = None,
    instance_schema_uri: Optional[str] = None,
    parameters_schema_uri: Optional[str] = None,
    prediction_schema_uri: Optional[str] = None,
    sync: bool = True,
):
    from google.cloud import aiplatform

    aiplatform.init(project=project, location=location)

    # artifact_uri needs to point into a folder
    artifact_uri = input_model.uri.replace('model.bst', '')

    model = aiplatform.Model.upload(
        display_name=display_name,
        artifact_uri=artifact_uri,
        serving_container_image_uri=serving_container_image_uri,
        serving_container_predict_route=serving_container_predict_route,
        serving_container_health_route=serving_container_health_route,
        instance_schema_uri=instance_schema_uri,
        parameters_schema_uri=parameters_schema_uri,
        prediction_schema_uri=prediction_schema_uri,
        description=description,
        serving_container_command=serving_container_command,
        serving_container_args=serving_container_args,
        serving_container_environment_variables=serving_container_environment_variables,
        serving_container_ports=serving_container_ports,
        sync=sync,
    )

    model.wait()
ML model deployment and making predictions
To make predictions in Vertex AI, you can either run batch prediction runs or deploy a model into an endpoint for online/on-demand predictions. You can create an endpoint for serving predictions from the UI or use the Vertex AI API. For this example, we create an endpoint through the Vertex AI UI. Before you can create an endpoint, you must have the first version of your ML model uploaded to the Vertex AI Model registry.
For this demo, the following properties were used:
- Endpoint name: xgboost-classifier-endpoint
- Access: standard
- Encryption: Google-managed encryption key
- Model name: XGBoost demo model
- Version: 1
- Traffic split: 100%
- Compute resources
- Min number of compute nodes: 1
- Max number of compute nodes: 1
- Machine type: n1-standard-4
- Service account: no service account for this demo
- Logging: Disable container logging for this endpoint since we won’t be needing it for this demo. However, this is recommended to enable endpoints that aren’t used for demonstration purposes
After the initial deployment, you can add an automated deployment task to the Vertex AI Pipeline. For the first run, the automatic upload would be more complex since you’d need to create an endpoint only on the first run. It makes more sense to run the initial model training, deploy it manually, and after that use continuous model deployment in the pipeline by using the endpoint ID.
When the model is deployed, you can use the Vertex AI UI to test the endpoint. Vertex AI documentation shows an example of how different model types need to have their prediction requests formatted. For the XGBoost model the format is
{
    "instance": [list of values]
}
For the demo model, the input is a two-dimensional array with encoded values. The value lists below are shortened for readability’s sake but each of them contains 118 values in this demo.
{
    "instances":[
        [1.00, 9.00,  … , 0.00],
        [0.00, 3.11,  … , 2.00],
        [0.00, 1.00,  … , 0.00],
        [7.00, 2.55,  … , 1.00]
    ]
}
The request contains 4 arrays to predict. The response shows the predicted values for each label:
{
    "predictions": [
      [
        0.002193997381255031,
        0.002332091564312577,
        0.002038412028923631,
        0.002095675095915794,
        0.006745354738086462,
        0.08032210171222687,
        0.003792420728132129,
        0.002770024351775646,
        0.003066644771024585,
        0.009444242343306541,
        0.03852067515254021,
        0.05888376012444496,
        0.001530230627395213,
        0.001840698532760143,
        0.001146514434367418,
        0.004052345640957355,
        0.004351818934082985,
        0.7638190984725952,
        0.002000037115067244,
        0.001350842299871147,
        0.004530482925474644,
        0.001577813294716179,
        0.00159473973326385
      ],
      [
        0.0001293844688916579,
        0.00007976880442583933,
        0.0002750818093772978,
        0.00009423528535990044,
        0.0003249940928071737,
        0.002482031704857945,
        0.0001705319882603362,
        0.000473131105536595,
        0.00006512731488328427,
        0.00007627454760950059,
        0.0002844831615220755,
        0.993921160697937,
        0.00006880921864649281,
        0.00008276989683508873,
        0.0001957786007551476,
        0.0001288504281546921,
        0.0004002489149570465,
        0.00006773958739358932,
        0.00009312719339504838,
        0.00006074269185774028,
        0.0001216991513501853,
        0.0003558380412869155,
        0.00004816313594346866
      ],
      [
        0.00001361482736683683,
        0.00002107266300299671,
        0.000007434492545144167,
        0.000009916159797285218,
        0.00003419840504648164,
        0.00001636508204683196,
        0.00004369518865132704,
        0.00001702426379779354,
        0.000006853203103673877,
        0.00002716925519052893,
        0.000008004293704289012,
        0.9996036887168884,
        0.000007240634204208618,
        0.000008709684152563568,
        0.00002159653377020732,
        0.00000738362587071606,
        0.00009178058098768815,
        0.000007547666427853983,
        0.000009799568033486139,
        0.000006391817805706523,
        0.000012806130143872,
        0.00001260369481315138,
        0.000005068099653726676
      ],
      [
        0.0005472928751260042,
        0.0005408588913269341,
        0.0003375605447217822,
        0.0004502397496253252,
        0.001367041375488043,
        0.8636042475700378,
        0.0008147729095071554,
        0.0007302797166630626,
        0.000658845470752567,
        0.0874922126531601,
        0.004770467057824135,
        0.006231324747204781,
        0.0003287584404461086,
        0.0003954601415898651,
        0.000980583019554615,
        0.004323961213231087,
        0.0006123862112872303,
        0.02378813922405243,
        0.0004296927072573453,
        0.0002902182459365577,
        0.0005814573378302157,
        0.0003815836971625686,
        0.000342617800924927
      ]
    ],
    "deployedModelId": "model ID omitted",
    "model": "model URL omitted",
    "modelDisplayName": "XGBoost demo model",
    "modelVersionId": "1"
   }
Vertex AI Pipeline definition and deployment
Now that we have all our Python components, we need to create the definition for the actual Vertex AI Pipeline. As a recap, the pipeline consists of the following pipeline tasks:
- Get data
- Train XGBoost model
- Validate the model
- Upload model to model registry
from kfp.v2.dsl import (
    component,
    pipeline,
    Condition
)

@pipeline(

    pipeline_root="gs://vertex-pipelines-demo/vertex-pipelines",
    name="vertex-demo-pipeline",
)
def pipeline():
    data_preparation = get_kddcup99_data()
    train = xgboost_train_model(
        data_preparation.outputs["dataset"],
        data_preparation.outputs["pred_target"],
        data_preparation.outputs["Output"]
    )
    with Condition(train.outputs["Output"] >= 0.7, name='model-upload-condition'):
        input_model = upload_to_model_registry(
            project='your-gcp-project',
            location='europe-west4',
            display_name='XGBoost demo model',
            serving_container_image_uri='europe-docker.pkg.dev/vertex-ai/prediction/xgboost-cpu.1-5:latest',
            input_model=train.outputs["model"],
            description='XGBoost demo model for classifying attacks'
        )
Creating a pipeline run in Vertex AI means essentially deploying the pipeline code. The deployment creates a pipeline run that can be reviewed from the Vertex AI Pipeline UI. Deployment can be automated in a CI/CD pipeline. The deployment is essentially compiling the component and pipeline definitions into a JSON file and deploying that file to Vertex AI Pipelines via API.
The choice of using cache for the pipeline really depends on if the use case can benefit from it.
When the pipeline job is submitted, the response contains the PipelineJob resource name, the job definition for using it in another session, and a link to view the PipelineJob in UI.
Wrapping up
In real-world use cases, the pipelines are rarely as simple but the point of the demo is to illustrate and give you a feel of the basic concepts of Vertex AI and MLOps. By utilizing the learnings from the demo, you can hopefully get started configuring your own pipeline that suits your needs.
We did not cover the last part of the MLOps framework: model monitoring. However, model monitoring is possible to be set up in Vertex AI. You can take a look into Vertex AI Model Monitoring to see how the model monitoring can be set up to detect model skew and drift.
If you want to create a demonstration environment and deploy the model into an endpoint, you can find the source codes from Recordly’s public GitHub repository. Make sure to clear out the unneeded resources after experimenting so they won’t unnecessarily cost you money to keep running!
Want to become a trailblazer? Go on record to join our kick-ass troops. You can also leave us a note to make your business data rain 👇