Written by —
Written by —
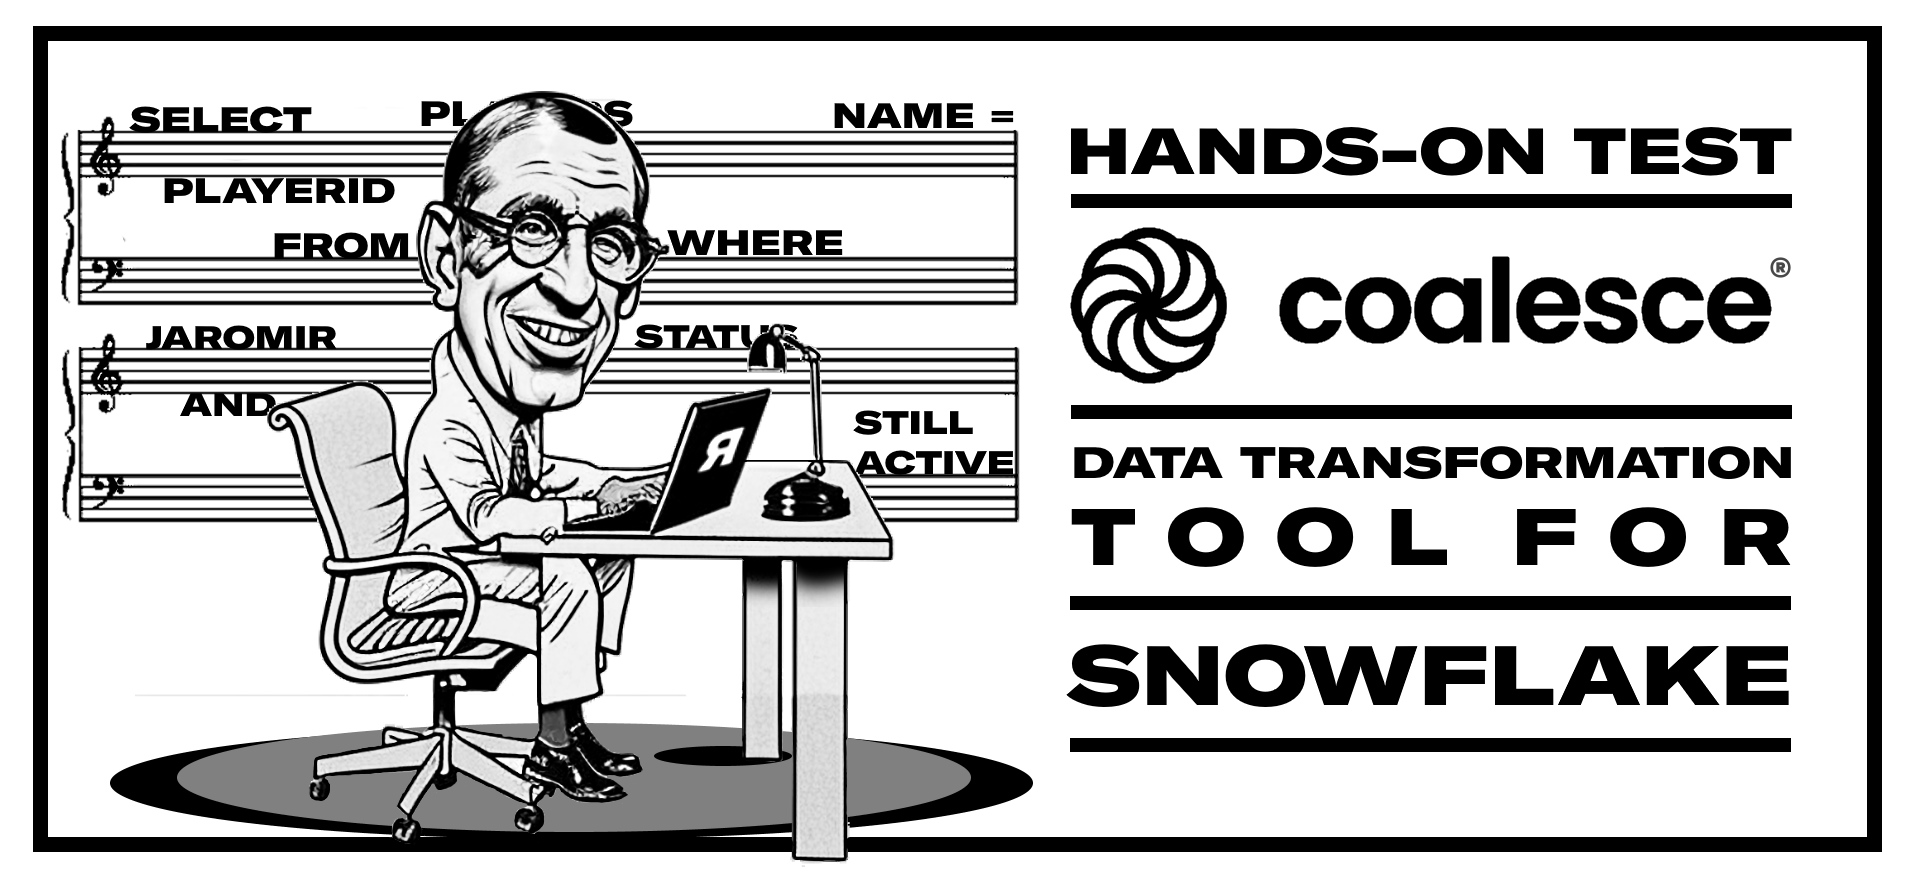
Coalesce is a new SaaS data transformation tool founded in 2020 to speed development on top of Snowflake (as of now Snowflake is also the only supported database). Coalesce offers out-of-the-box capabilities for creating robust data pipelines using a graphical user interface. In this blog, I will test out Coalesce with my datasets and show you how easily you can build a star-schema model with slowly changing dimensions without any SQL coding needed.
As I have previously mentioned in my blogs, I and all of us at Recordly are keen on using SaaS-based tools as part of data platform architecture as those are better in several factors - no vendor locks, they are more secure than artisan “data platform solutions”, they are cheaper due to amount of installations and lastly they are more sustainable because SaaS -products use efficient code and infrastructure and on multi-tenant deployment models are share the infrastructure requiring less infrastructure.
This blog post is split into the following chapters in case you’re interested only in a certain part of the product behaviour.
DISCLAIMER: This demo is built upon using the Demo version which I was granted access by Coalesce sales support and doesn't represent nearly all the possibilities of the whole product like creating an fully functional DV nor exploring the in depth functionalities. I'm merely going to show how easily and fast one can create an a simple solution without further knowledge of Coalesce.
- Data set used during testing
- Loading data into Snowflake
- Setting up Coalesce
- Creating a data pipeline (Graph)
- Visibility on data changes - Column Lineage
- Testing data quality
- Scheduling the data pipeline
- Git Integration
- Deployment from Dev to higher environments
- Multi-user environment
- Automatic documentation out of the box
- Wrapping up
Data set used during testinG
For simplicity's sake, I have used a smallish dataset where I can easily identify the joins and I do understand the data context. I have extracted Martin Ellis’s NHL Game dataset from Kaggle. The dataset contains 13 raw tables, varying sizes from 50K up to 7 million rows on the “fact” table candidates having data from starting from season 2000-2001 up until 2019-2020. From those 13 tables, I will create the following star schema to identify what was the game where Jaromír Jágr played the biggest minutes (on this dataset) and how that game ended.
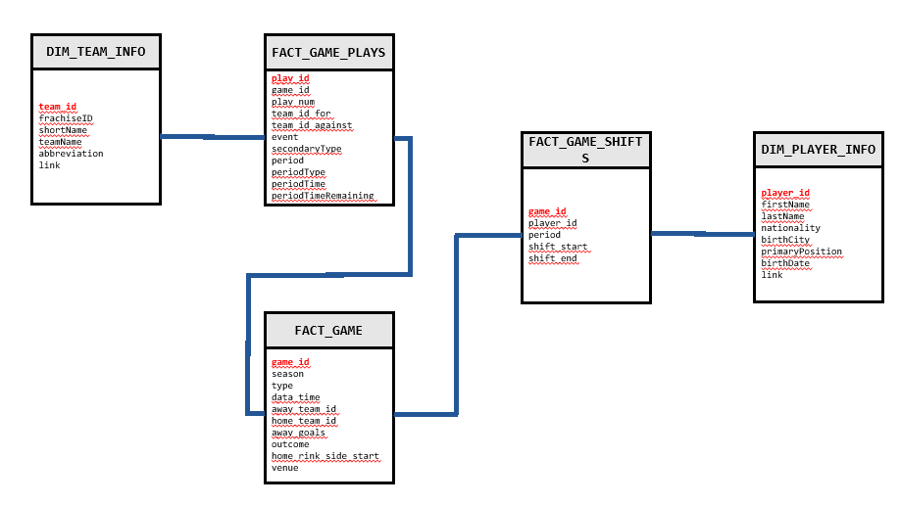 Figure 1. Data Model
If Jaromír Jágr is not familiar to you, I recommend reading my blog where I explain the importance of sustainable SQL, i.e. how to write SQL that's stand's time between projects and consults, by using Jaromír's long career as an example (the image is a link to the actual blog post).
Loading data into Snowflake
Coalesce is a pure transformation tool, hence it doesn’t offer any capabilities on data loading. Similarly, like dbt, Coalesce expects that the source data is loaded into Snowflake by some other tool. For that purpose, you can use multiple tools like Azure Data Factory, Snowpipe or Fivetran. In this case, I have manually uploaded the source CSV files into my Azure account and created the necessary Storage Integration between my Azure account and my Snowflake account. After creating the storage integration, I manually created the database, warehouse, schemas and source tables into Snowflake as inside Coalesce you will point to those using Storage Locations. SQL needed to create the source tables can be found on my Github -account in case you want to try this out yourself. Once I created the source tables, I ran the COPY INTO -clauses using Snowsight and populated the tables accordingly.
Setting up Coalesce
Inside Coalesce you are greeted with a simplistic view of your Workspaces (more on that later). We will be working most of our time on the Build view as inside Build -tab you’ll create the necessary data pipelines.
 Figure 2. Workspaces view
Before we can start building, we need to add our Snowflake connection information to our Dev -workspace.
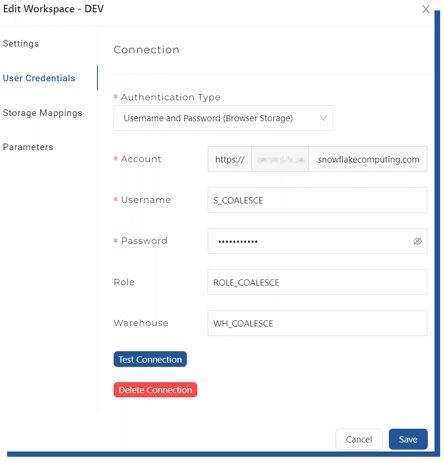 Figure 3. Snowflake connection string settings
You’ll need to provide your Snowflake -account details and the necessary role and warehouse you want to dedicate to this environment (the parameters are Environment-specific allowing you to control multiple Snowflake accounts from one environment – more about this on Deployment from Dev to higher environments). After adding the connection details, we can move on to creating our Storage Locations.
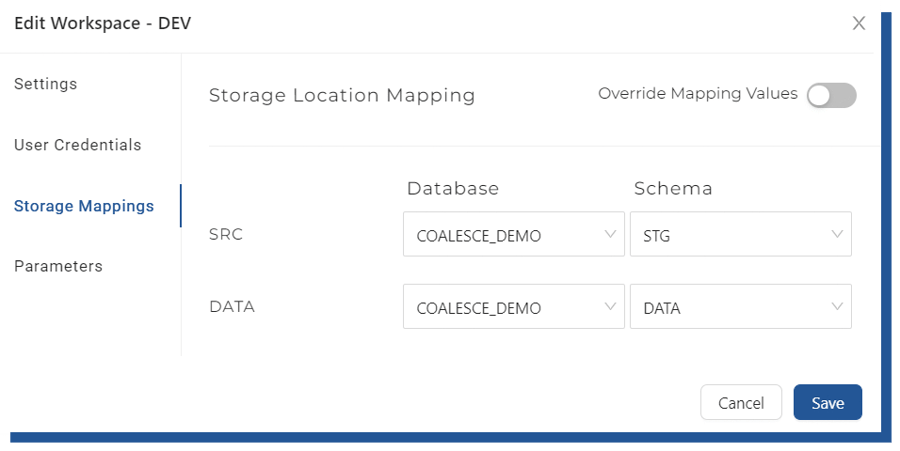 Figure 4. Storage Location mappings
Storage locations are a set of database and schema pairs which are mapped to Coalesce objects. Storage locations are then used later on when we create our tables, where we can define to which Storage location we want Coalesce to store our data. In this demo, I will choose STG schema as SRC locations as my raw data is located there. DATA -schema I will use to store my persistent nodes and presentation layer.
Creating a data pipeline (Graph)
Inside the Build view, you’ll first see the Browser which will show all of your mapped nodes and graphs. Nodes are in Coalesce context tables and views and such entities. Nodes belong to a Graph, which is a different naming for a DAG or in its simplest form, a data pipeline.
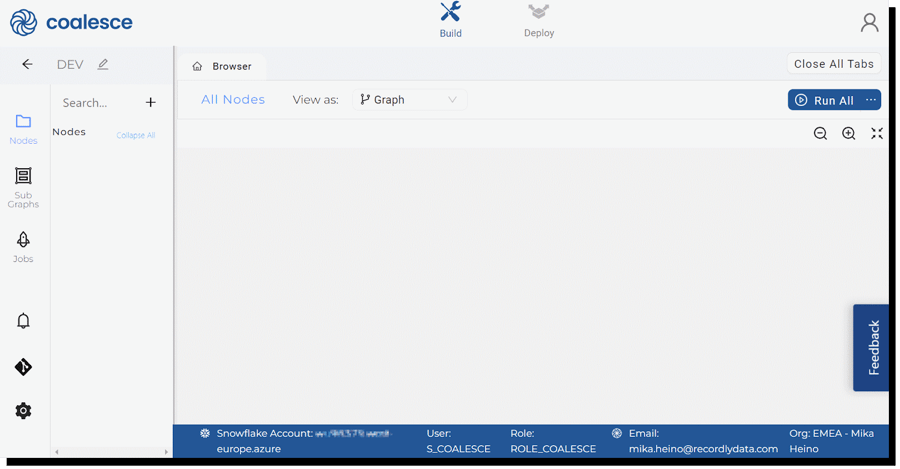 Figure 5. Main build view
Out of the box, Coalesce offers a few ready to be used node-types; source, stage, persistent stage, fact and dimension nodes. Node types are not just empty containers, they behave differently.
DISCLAIMER: More nodes are available by request from Coalesce support. Coalesce supports Data Vault 2.0 node types (Hub, Links and Satellites etc)
- Source nodes are used to represent the raw source data as they are in Snowflake. They can’t be edited or modified in any way.
- Stage nodes are the nodes where you load your source data to be transformed with your business logic. Stage nodes are by default truncated before every run and always contain the current batch data.
- Persistent stage nodes are like stage nodes that are not truncated and can persist the data indefinitely. They also support change history when a business key is defined (Coalesce will create the necessary INSERT INTO -clause automatically).
- Fact - table is Coalesce implementation of Kimball’s fact table. Coalesce offers two ways of populating the table, if no business is defined, the table will be loaded using an INSERT statement. When the business key is defined, Coalesce will use the MERGE -statement to load the fact table.
- Dimension tables describe the fact tables. Coalesce requires you to add a business key for them. Coalesce currently supports creating Type 1 and Type 2 slowly changing dimensions (for Type 2 dimension you need to define the change tracking column). Like previously, Coalesce will generate all the necessary SQL automatically based on the choices you make.
So, now that we know the basic node types, let’s add our source tables and create the necessary stage -tables.
Adding source tables
Adding sources happens by going to the “Add Sources” -button near Nodes and selecting desired source tables.
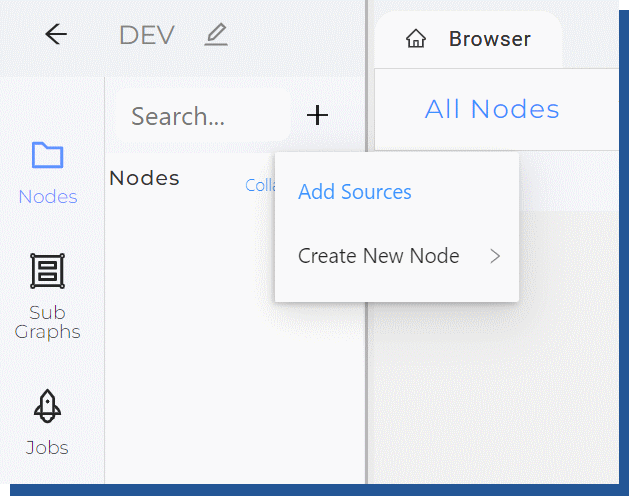 Figure 6. Adding nodes in UI
Coalesce will show you a preview of the data and you can select multiple sources at once. The process here is very simple.
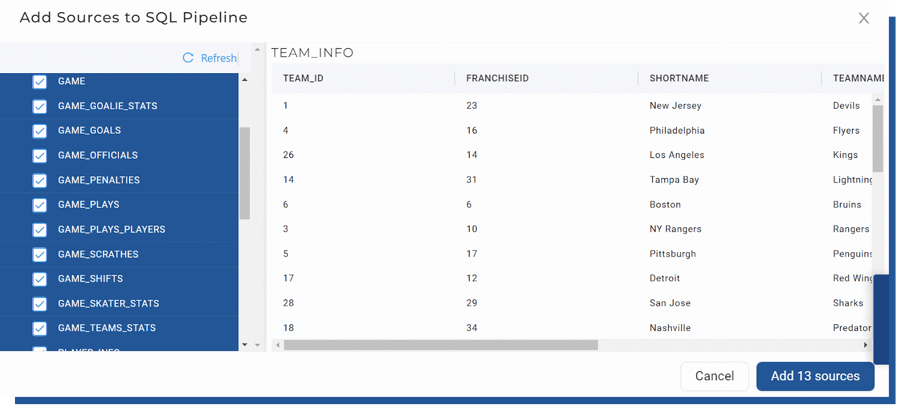 Figure 7. List of source tables
Once you have added the sources, you’re back to the Browser view, where you can see your source tables either in Graph, Node Grid or Column Grid -view. I have used Graph -view in my data pipeline.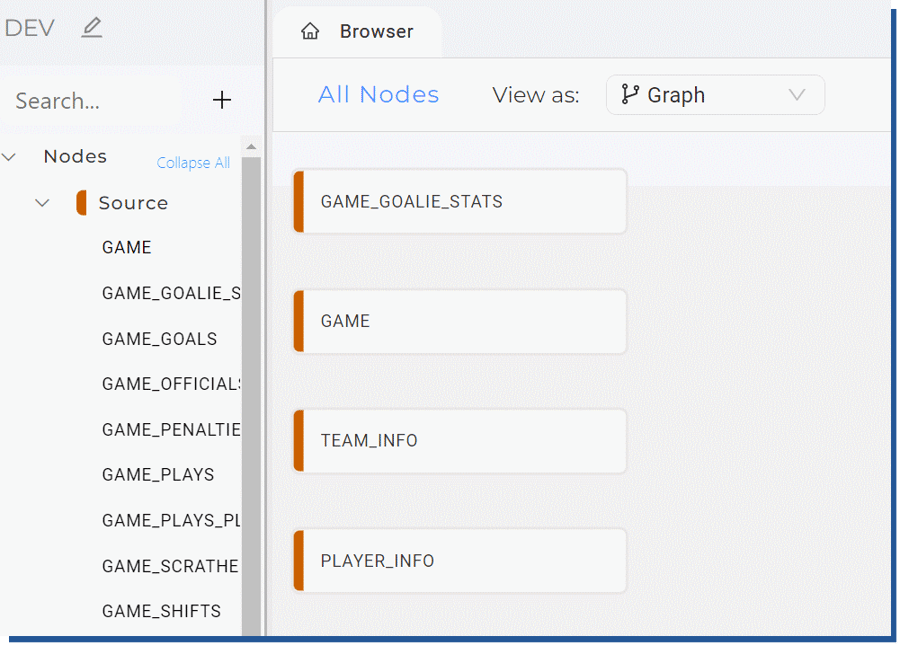 Figure 8. Source nodes in UI view
Creating stage -tables
We could create stage -tables for all the sources, but for now, we want to keep things simple and create the stage -tables only for sources that are needed in the star schema described in the Data set -chapter.
Creating stage -tables happens by selecting the source nodes you want to have the stage -created and with the right mouse button, you select “Add Node” and select Stage node.
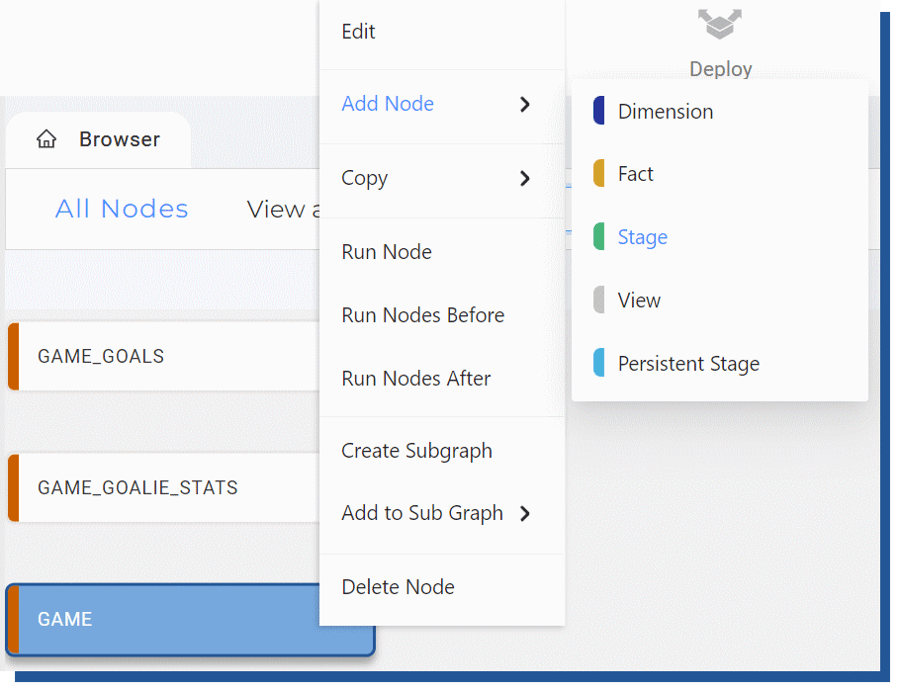 Figure 9. Adding stage node for source using UI
Selecting this creates the stage nodes, with STG_ -prefix as shown in the TEAM_INFO -node.
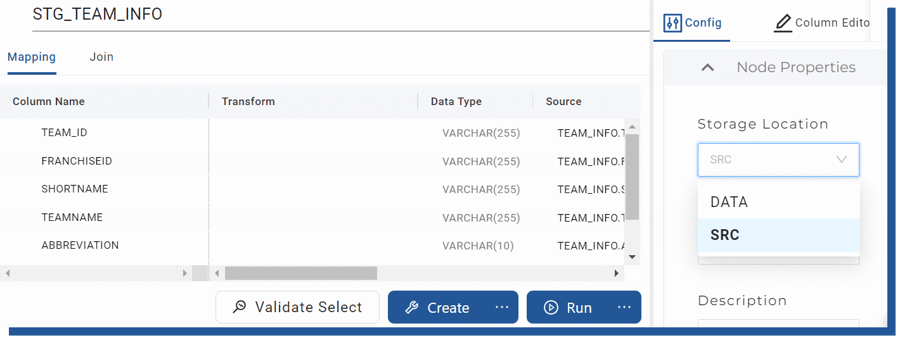
Figure 10. Setting Storage Location for node
This node is still an empty shell, nothing has been created at Snowflake yet. You have the option to change the Storage Location as previously discussed. For this entity, I have chosen DATA Storage Location which points to a separate DATA -schema inside my database.
I can also Validate my table SQL syntax by selecting “Validate Select” which will execute the “EXPLAIN USING text SELECT …” -query against Snowflake. This is useful for example checking if you have faulty SQL defined in your data load SQL (like in this case, the correct syntax would have been TO_NUMBER().)
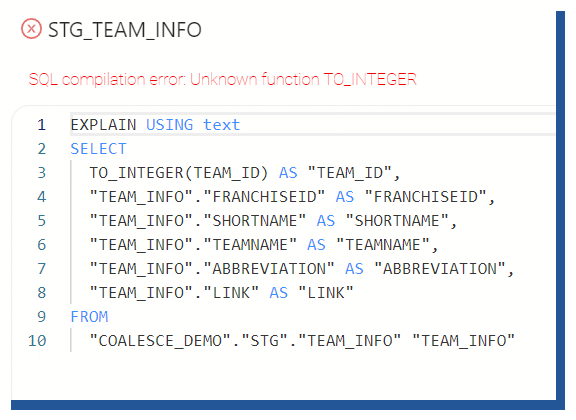 Figure 11. "Using Validate Select" to show syntax errors
Once you are happy with your table schema, you can create the table. Coalesce will show you the SQL that it has executed against Snowflake and let you copy that into a separate tool if necessary.
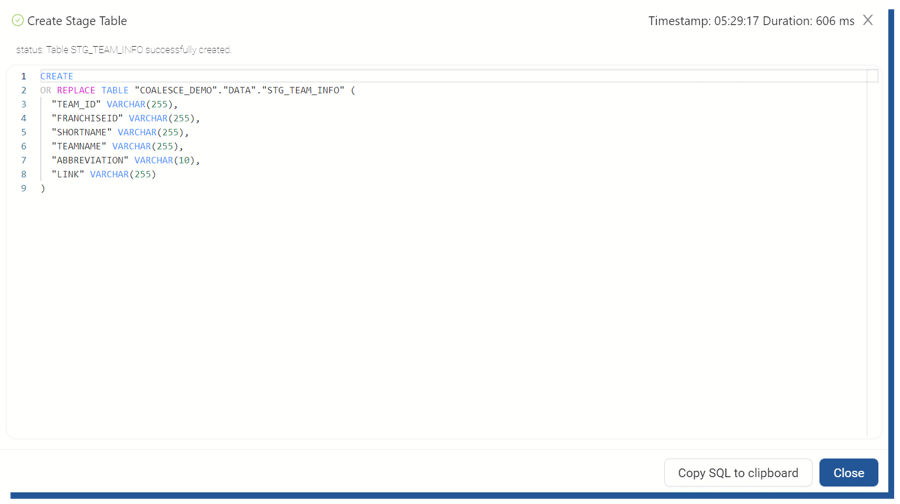 Figure 13. "Create table" -statement created by Coalesce
The final step is to load the data by selecting the Run -button which also offers a similar Validate Run option for the testing run SQL without actually running it. Of course, we could execute the Run for all the tables, but for the sake of demonstrating this option, I’m only selecting one node at a time.
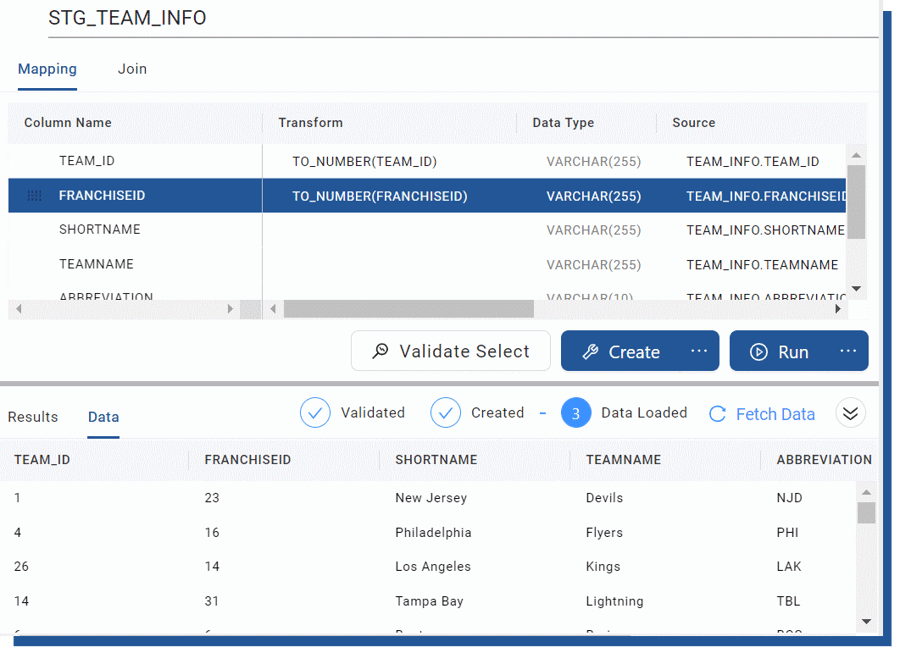 Figure 14. Creating and loading the defined table
Coalesce will also show the loaded data as it’s now residing inside Snowflake and if you choose, it will also show the SQL it has generated for loading the data (this INSERT SQL is for a different table where I needed to tackle the issue of having shift start and end columns having NA values instead of integer values for certain players).
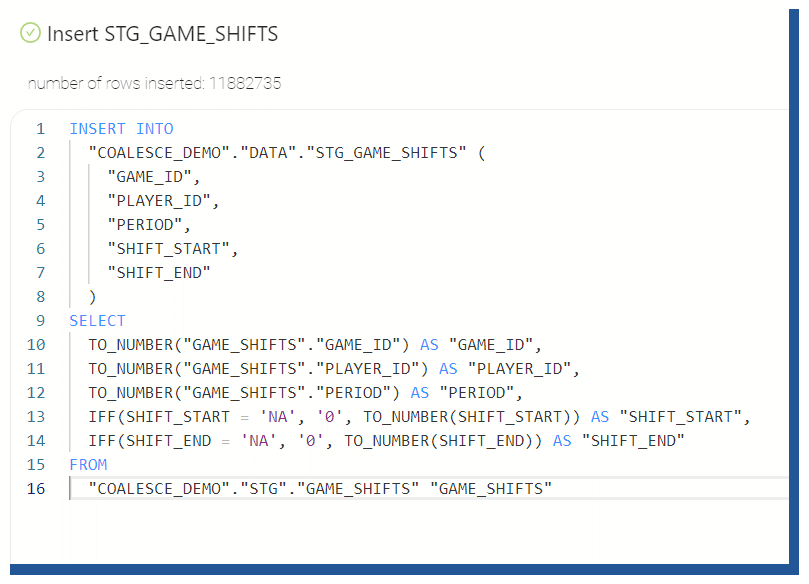 Figure 15. Coalesce created "Create table" -statement
Once all the tables have been created and loaded, Coalesce will show a green tick on the nodes.
 Figure 16. Coalesce view of correctly loaded tables
Creating facts and dimensions
Creating fact and dimension nodes happens like creating the stage nodes. Difference is that you have the option to define business keys and change tracking keys which will affect the actual INSERT INTO.
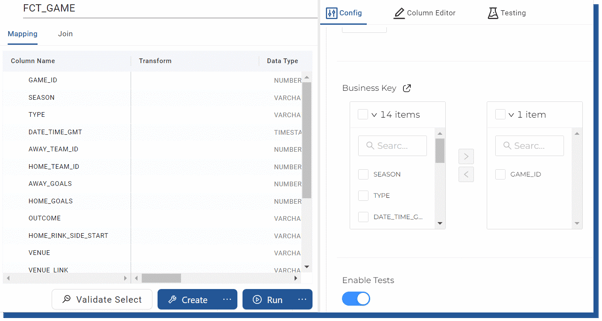 Figure 17. Adding business key to Fact -table
Selecting the GAME_ID as a business key will generate the following SQL for inserting rows to the fact table. Without the GAME_ID the SQL is a simple INSERT INTO -SQL clause. This SQL output is for the Type 2 dimension and shows Coalesce builds the SQL for you.
MERGE INTO "COALESCE_DEMO"."DATA"."DIM_TEAM_INFO" "TGT" USING (
  /* New Rows That Don't Exist */
  SELECT
    "STG_TEAM_INFO"."TEAM_ID" AS "TEAM_ID",
    "STG_TEAM_INFO"."FRANCHISEID" AS "FRANCHISEID",
    "STG_TEAM_INFO"."SHORTNAME" AS "SHORTNAME",
    "STG_TEAM_INFO"."TEAMNAME" AS "TEAMNAME",
    "STG_TEAM_INFO"."ABBREVIATION" AS "ABBREVIATION",
    "STG_TEAM_INFO"."LINK" AS "LINK",
    1 AS "SYSTEM_VERSION",
    'Y' AS "SYSTEM_CURRENT_FLAG",
    CAST(CURRENT_TIMESTAMP AS TIMESTAMP) AS "SYSTEM_START_DATE",
    CAST('2999-12-31 00:00:00' AS TIMESTAMP) AS "SYSTEM_END_DATE",
    CAST(CURRENT_TIMESTAMP AS TIMESTAMP) AS "SYSTEM_CREATE_DATE",
    CAST(CURRENT_TIMESTAMP AS TIMESTAMP) AS "SYSTEM_UPDATE_DATE",
    'INSERT_INITAL_VERSION_ROWS' AS "DML_OPERATION"
  FROM
    "COALESCE_DEMO"."DATA"."STG_TEAM_INFO" "STG_TEAM_INFO"
    LEFT JOIN "COALESCE_DEMO"."DATA"."DIM_TEAM_INFO" "DIM" ON
"STG_TEAM_INFO"."TEAM_ID" = "DIM"."TEAM_ID"
  WHERE
    "DIM"."TEAM_ID" IS NULL
  UNION ALL
    /* New Row Needing To Be Inserted Due To Type-2 Column Changes */
  SELECT
    "STG_TEAM_INFO"."TEAM_ID" AS "TEAM_ID",
    "STG_TEAM_INFO"."FRANCHISEID" AS "FRANCHISEID",
    "STG_TEAM_INFO"."SHORTNAME" AS "SHORTNAME",
    "STG_TEAM_INFO"."TEAMNAME" AS "TEAMNAME",
    "STG_TEAM_INFO"."ABBREVIATION" AS "ABBREVIATION",
    "STG_TEAM_INFO"."LINK" AS "LINK",
    "DIM"."SYSTEM_VERSION" + 1 AS "SYSTEM_VERSION",
    'Y' AS "SYSTEM_CURRENT_FLAG",
    CAST(CURRENT_TIMESTAMP AS TIMESTAMP) AS "SYSTEM_START_DATE",
    CAST('2999-12-31 00:00:00' AS TIMESTAMP) AS "SYSTEM_END_DATE",
    CAST(CURRENT_TIMESTAMP AS TIMESTAMP) AS "SYSTEM_CREATE_DATE",
    CAST(CURRENT_TIMESTAMP AS TIMESTAMP) AS "SYSTEM_UPDATE_DATE",
    'INSERT_NEW_VERSION_ROWS' AS "DML_OPERATION"
  FROM
    "COALESCE_DEMO"."DATA"."STG_TEAM_INFO" "STG_TEAM_INFO"
    INNER JOIN "COALESCE_DEMO"."DATA"."DIM_TEAM_INFO"
    "DIM" ON "STG_TEAM_INFO"."TEAM_ID" = "DIM"."TEAM_ID"
  WHERE
    "DIM"."SYSTEM_CURRENT_FLAG" = 'Y'
    AND (
      (
        NVL(
          CAST(
            "STG_TEAM_INFO"."TEAM_ID" as STRING
          ),
          '**NULL**'
        ) <> NVL(CAST("DIM"."TEAM_ID" as STRING), '**NULL**')
      )
      OR (
        NVL(
          CAST(
            "STG_TEAM_INFO"."FRANCHISEID" as STRING
          ),
          '**NULL**'
        ) <> NVL(CAST("DIM"."FRANCHISEID" as STRING), '**NULL**')
      )
    )
  UNION ALL
    /* Rows Needing To Be Expired Due To Type-2 Column Changes
                In this case, only two columns are merged (version and end date) */
  SELECT
    "DIM"."TEAM_ID" AS "TEAM_ID",
    "DIM"."FRANCHISEID" AS "FRANCHISEID",
    "DIM"."SHORTNAME" AS "SHORTNAME",
    "DIM"."TEAMNAME" AS "TEAMNAME",
    "DIM"."ABBREVIATION" AS "ABBREVIATION",
    "DIM"."LINK" AS "LINK",
    "DIM"."SYSTEM_VERSION" AS "SYSTEM_VERSION",
    'N' AS "SYSTEM_CURRENT_FLAG",
    "DIM"."SYSTEM_START_DATE" AS "SYSTEM_START_DATE",
    DATEADD(
      MILLISECONDS,
      -1,
      CAST(CURRENT_TIMESTAMP AS TIMESTAMP)
    ) AS "SYSTEM_END_DATE",
    "DIM"."SYSTEM_CREATE_DATE" AS "SYSTEM_CREATE_DATE",
    "DIM"."SYSTEM_UPDATE_DATE" AS "SYSTEM_UPDATE_DATE",
    'update_expired_version_rows' AS "DML_OPERATION"
  FROM
    "COALESCE_DEMO"."DATA"."STG_TEAM_INFO" "STG_TEAM_INFO"
    INNER JOIN "COALESCE_DEMO"."DATA"."DIM_TEAM_INFO" "DIM" ON
    "STG_TEAM_INFO"."TEAM_ID" = "DIM"."TEAM_ID"
  WHERE
    "DIM"."SYSTEM_CURRENT_FLAG" = 'Y'
    AND (
      (
        NVL(
          CAST(
            "STG_TEAM_INFO"."TEAM_ID" as STRING
          ),
          '**NULL**'
        ) <> NVL(CAST("DIM"."TEAM_ID" as STRING), '**NULL**')
      )
      OR (
        NVL(
          CAST(
            "STG_TEAM_INFO"."FRANCHISEID" as STRING
          ),
          '**NULL**'
        ) <> NVL(CAST("DIM"."FRANCHISEID" as STRING), '**NULL**')
      )
    )
  UNION ALL
    /* Rows Needing To Be Updated Due To Changes To Non-Type-2 source.columns
       This case merges only when there are changes in non-type-2 column updates,
       but no changes in type-2 columns*/
  SELECT
    "STG_TEAM_INFO"."TEAM_ID" AS "TEAM_ID",
    "STG_TEAM_INFO"."FRANCHISEID" AS "FRANCHISEID",
    "STG_TEAM_INFO"."SHORTNAME" AS "SHORTNAME",
    "STG_TEAM_INFO"."TEAMNAME" AS "TEAMNAME",
    "STG_TEAM_INFO"."ABBREVIATION" AS "ABBREVIATION",
    "STG_TEAM_INFO"."LINK" AS "LINK",
    "DIM"."SYSTEM_VERSION" AS "SYSTEM_VERSION",
    'Y' AS "SYSTEM_CURRENT_FLAG",
    "DIM"."SYSTEM_START_DATE" AS "SYSTEM_START_DATE",
    "DIM"."SYSTEM_END_DATE" AS "SYSTEM_END_DATE",
    "DIM"."SYSTEM_CREATE_DATE" AS "SYSTEM_CREATE_DATE",
    CAST(CURRENT_TIMESTAMP AS TIMESTAMP) AS "SYSTEM_UPDATE_DATE",
    'UPDATE_NON_TYPE2_ROWS' AS "DML_OPERATION"
  FROM
    "COALESCE_DEMO"."DATA"."STG_TEAM_INFO" "STG_TEAM_INFO"
     INNER JOIN "COALESCE_DEMO"."DATA"."DIM_TEAM_INFO" "DIM"
     ON "STG_TEAM_INFO"."TEAM_ID" = "DIM"."TEAM_ID"
  WHERE
    "DIM"."SYSTEM_CURRENT_FLAG" = 'Y'
    AND (
      "STG_TEAM_INFO"."TEAM_ID" = "DIM"."TEAM_ID"
      AND "STG_TEAM_INFO"."FRANCHISEID" = "DIM"."FRANCHISEID"
    )
    AND (
      NVL(
        CAST(
          "STG_TEAM_INFO"."SHORTNAME" as STRING
        ),
        '**NULL**'
      ) <> NVL(CAST("DIM"."SHORTNAME" as STRING), '**NULL**')
      OR NVL(
        CAST(
          "STG_TEAM_INFO"."TEAMNAME" as STRING
        ),
        '**NULL**'
      ) <> NVL(CAST("DIM"."TEAMNAME" as STRING), '**NULL**')
      OR NVL(
        CAST(
          "STG_TEAM_INFO"."ABBREVIATION" as STRING
        ),
        '**NULL**'
      ) <> NVL(
        CAST("DIM"."ABBREVIATION" as STRING),
        '**NULL**'
      )
      OR NVL(
        CAST("STG_TEAM_INFO"."LINK" as STRING),
        '**NULL**'
      ) <> NVL(CAST("DIM"."LINK" as STRING), '**NULL**')
    )
) AS "SRC" ON "TGT"."TEAM_ID" = "SRC"."TEAM_ID"
AND "TGT"."SYSTEM_VERSION" = "SRC"."SYSTEM_VERSION"
WHEN MATCHED THEN
UPDATE
SET
  "TGT"."FRANCHISEID" = "SRC"."FRANCHISEID",
  "TGT"."SHORTNAME" = "SRC"."SHORTNAME",
  "TGT"."TEAMNAME" = "SRC"."TEAMNAME",
  "TGT"."ABBREVIATION" = "SRC"."ABBREVIATION",
  "TGT"."LINK" = "SRC"."LINK",
  "TGT"."SYSTEM_VERSION" = "SRC"."SYSTEM_VERSION",
  "TGT"."SYSTEM_CURRENT_FLAG" = "SRC"."SYSTEM_CURRENT_FLAG",
  "TGT"."SYSTEM_START_DATE" = "SRC"."SYSTEM_START_DATE",
  "TGT"."SYSTEM_END_DATE" = "SRC"."SYSTEM_END_DATE",
  "TGT"."SYSTEM_UPDATE_DATE" = "SRC"."SYSTEM_UPDATE_DATE"
  WHEN NOT MATCHED THEN
INSERT
  (
    "TEAM_ID",
    "FRANCHISEID",
    "SHORTNAME",
    "TEAMNAME",
    "ABBREVIATION",
    "LINK",
    "SYSTEM_VERSION",
    "SYSTEM_CURRENT_FLAG",
    "SYSTEM_START_DATE",
    "SYSTEM_END_DATE",
    "SYSTEM_CREATE_DATE",
    "SYSTEM_UPDATE_DATE"
  )
VALUES
  (
    "SRC"."TEAM_ID",
    "SRC"."FRANCHISEID",
    "SRC"."SHORTNAME",
    "SRC"."TEAMNAME",
    "SRC"."ABBREVIATION",
    "SRC"."LINK",
    "SRC"."SYSTEM_VERSION",
    "SRC"."SYSTEM_CURRENT_FLAG",
    "SRC"."SYSTEM_START_DATE",
    "SRC"."SYSTEM_END_DATE",
    "SRC"."SYSTEM_CREATE_DATE",
    "SRC"."SYSTEM_UPDATE_DATE"
  )
Our outcome looks something like this in Graph -form. This example is by purpose straightforward even though you could build more complex, like Data Vault, models using Coalesce.
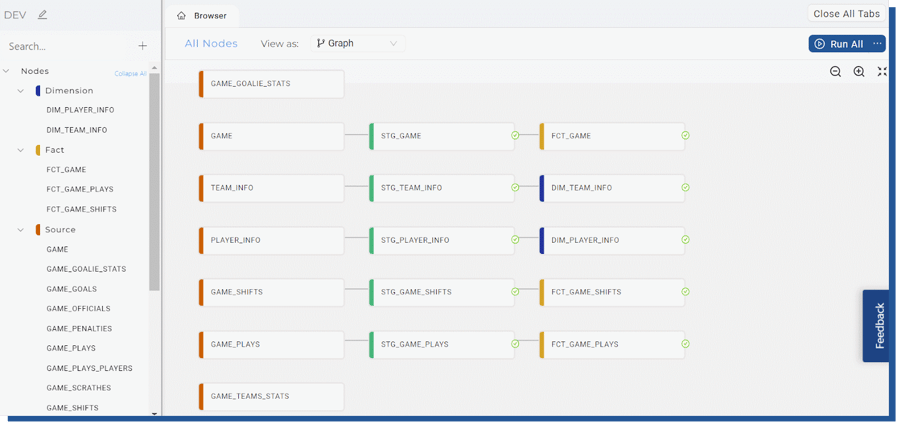 Figure 18. Finished data pipeline
Visibility on data changes - Column lineage
Column lineage is a feature that Coalesce includes to show from which source table a certain column is transformed and added (as illustrated below). In this tiny example the feature doesn’t shine, but when you having multiple source tables joined and the transformation pipeline is long, this feature is really hand on pinpointing original data.
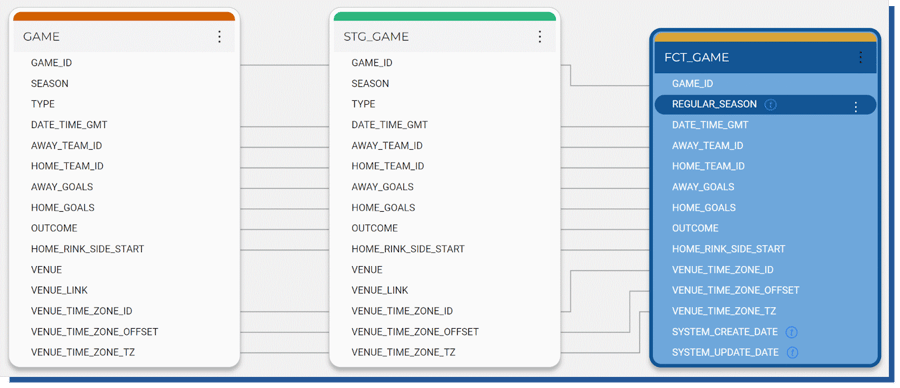 Figure 19. Column lineage view
Testing the data quality
Coalesce offers few data quality testing capabilities out of the box like testing whether the business key is UNIQUE or desired column is NOT NULL. For more granular testing, Coalesce relies on a trusted way of writing your SQL queries against the data sets.
Selecting proper tests happens by selecting desired node and the test you want to add to certain columns.
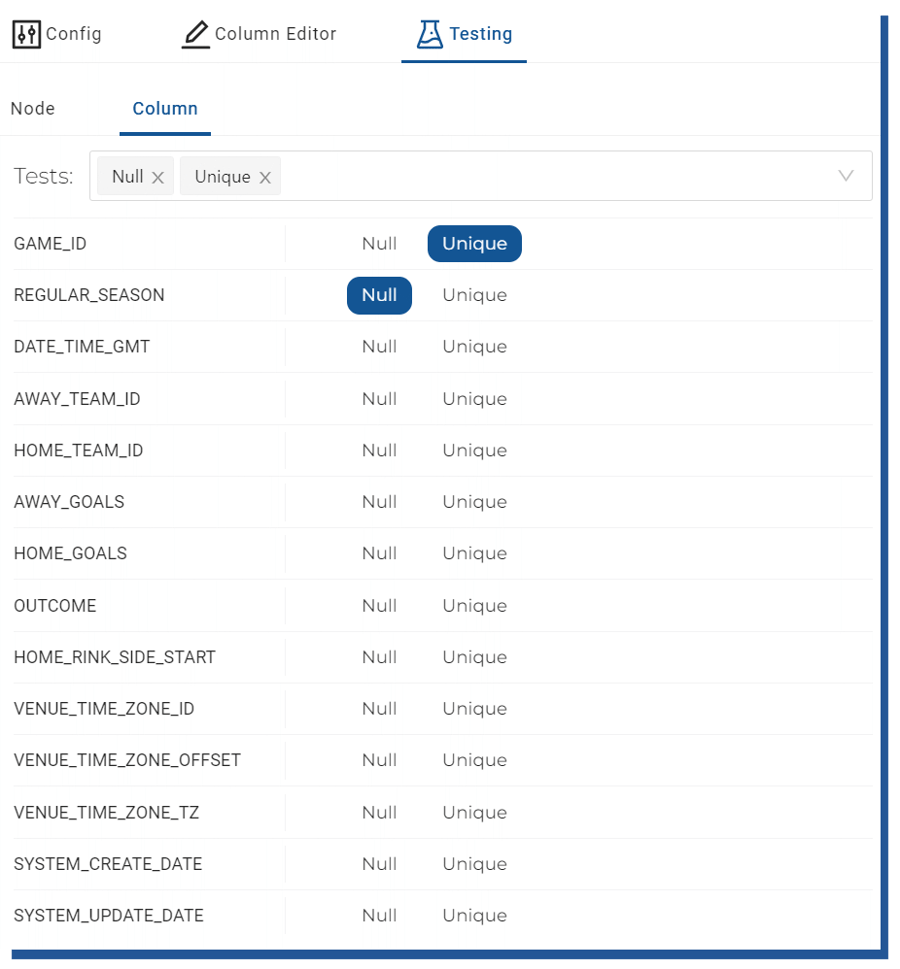 Figure 20. Adding data quality tests
And when the test fails, you are greeted with an error message during the loading process.
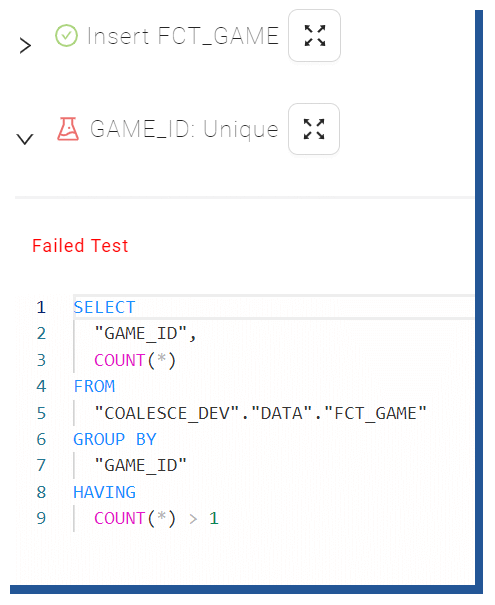 Figure 21. Failed test -info box
Scheduling the data pipeline
As of now, Coalesce doesn’t offer any tools or workflow scheduler to schedule your data pipeline. Rather than building their scheduler, they rely on already existing tools such as GitHub Actions and Azure DevOps pipelines. Coalesce offers an API -layer through which you can schedule your environment refresh with only a few steps needed.
Git Integration
Git integration is built heavily into the Coalesce tools and everything that you build using the tool is stored in .yml -files. You can see an example of the files generated from my Github -account which I used for storing the pipeline built in this demo. Each table/node is a separate yml -file which contains a reference(s) to the table for where it’s loaded. One separate yml -file defines all yml-files which are related to one data pipeline.
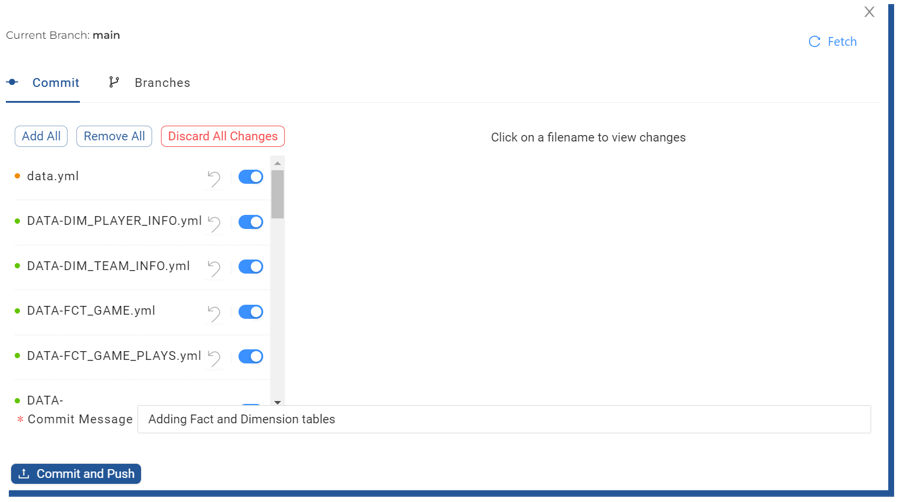 Figure 22. Committing data pipeline into Git
From the actual files, you can see similar reference (see “joinCondition”) syntax that for example, dbt uses to create the data pipelines.
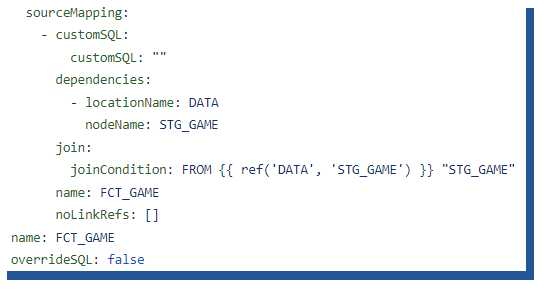 Figure 23. YAML generated by Coalesce
Deployment from DEV to higher environments
Deployment into “higher” environments happens by setting up a separate environment into a Workspace. One workspace can have multiple environments, which all can have separate storage locations which define where nodes are created.
In this example, I have created a separate TEST environment in my DEV workspace. The test environment is similar in all ways to my Dev environment, but the storage locations are pointing to the COALESCE_TEST database where I manually created the necessary schemas (STG, DATA) needed. Once I had created the TEST environment, it came automatically visible in my Deploy -view.
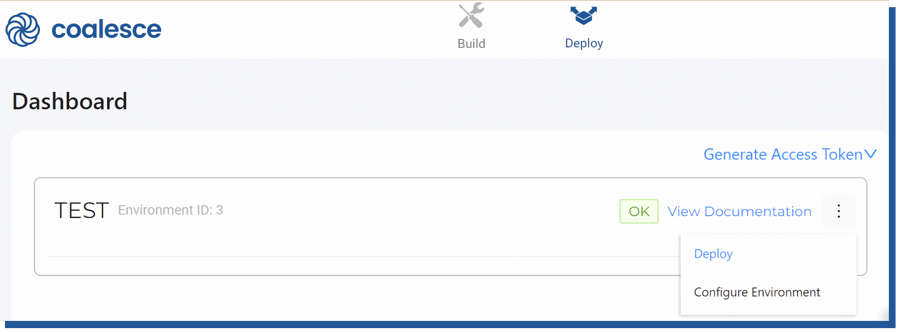 Figure 24. Choosing higher environment where to deploy
From Deploy, I chose “Deploy” and was given the option to choose my preferred git Commit which I would like to deploy into the TEST -environment.
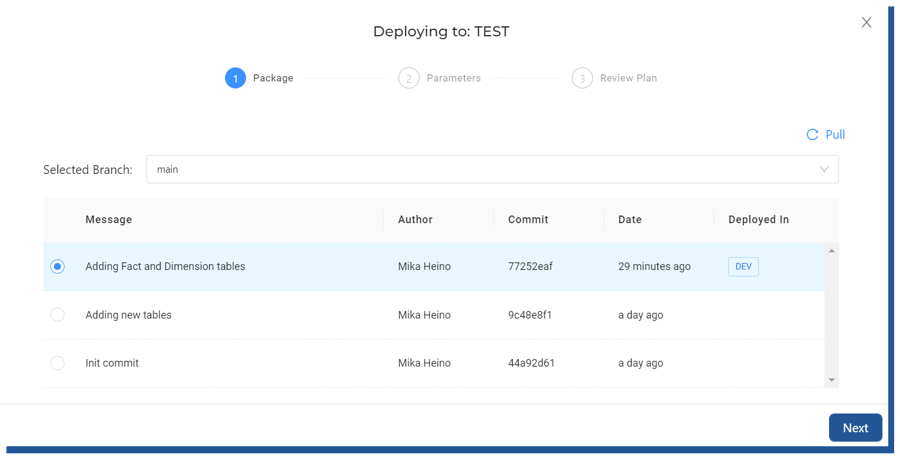 Figure 25. Deployment to a higher, TEST, environment
After choosing the latest commit, the steps were straightforward. I only needed to choose “Deploy”.
In this phase, I needed to create the necessary source objects, which I had manually created into Snowflake before starting up Coalesce and were used as referred nodes. Without knowing this, my first deployment failed with an error claiming false mappings. This process will create the necessary nodes and such, but will not populate the data. For that, you need to use the Refresh API and the scheduling processes described in the “Scheduling the data pipeline” -chapter.
Multi-user environment
Coalesce is built with a multi-user environment in mind. Each workspace is its own separate island where the developer can work on their own data stories without affecting other team members. Like stated in Coalesce documentation “For example, a data engineer may be tasked with creating a new data mart. They could create a new workspace with its own git branch, separate from the main workspace. Once the feature is done, its code can be merged back into the main branch.”. This is visible on Creating workspace. When I choose to create a new workspace from the UI, I’m greeted with options to choose from which git commit to continue my work.
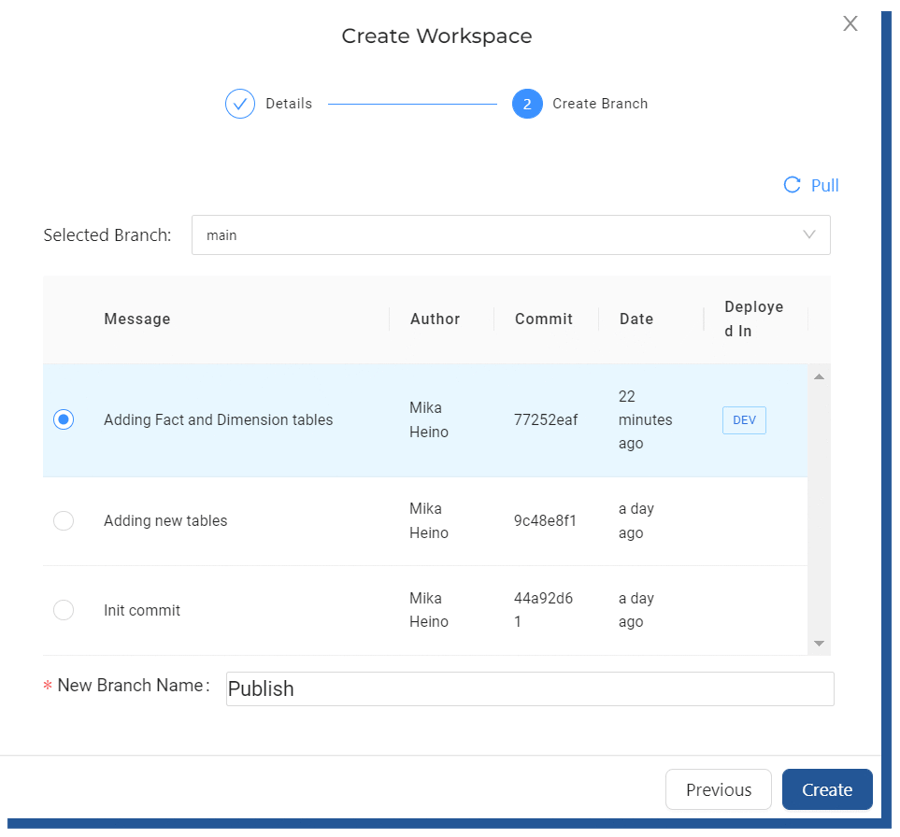 Figure 26. Creating workspace from latest commit
Automatic Documentation out of the box
Coalesce also offers all the data that’s inside the tool as browsable documentation to be used. This means that all table descriptions, columns, and node lineages are visible for any logged users to browse. Bundled with the column-lineage option this very helpful feature as users can now easily identify which source table is producing inaccurate data without logging into the Build view (use cases would be to give business users login into Coalesce but show them only the documentation side).
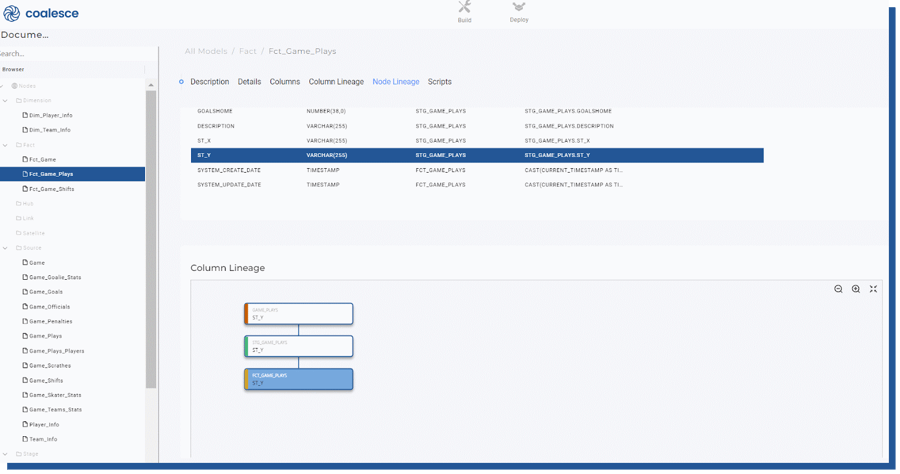 Figure 27. Documentation view
Wrapping up
As you can see, using and setting up a data pipeline in Coalesce is easy. How do I know this? Because I had zero training or knowledge of Coalesce before I started testing the product hands-on. It took me only a few minutes to realize the concepts behind building the actual mappings and transformations. With the help of Coalesce documentation, I was able to understand the higher concepts like differences between Workspaces and Environments, and once I got the hang of that I was able to deploy my tables into different environments with ease.
The only question that remains is, in which game Jaromír Jágr played the biggest minutes according to the dataset and how that game ended. Well, let's look. Let's calculate the time on ice from FCT_GAME_SHIFTS and filter that to the player id we all know. When we join the information to FCT_GAME and DIM_TEAM_INFO we are greeted with the information that the longest game (according to this dataset happened on 13.6.2013 at United Center where Chicago Blackhawks won over Boston Bruins in overtime by 3-4.
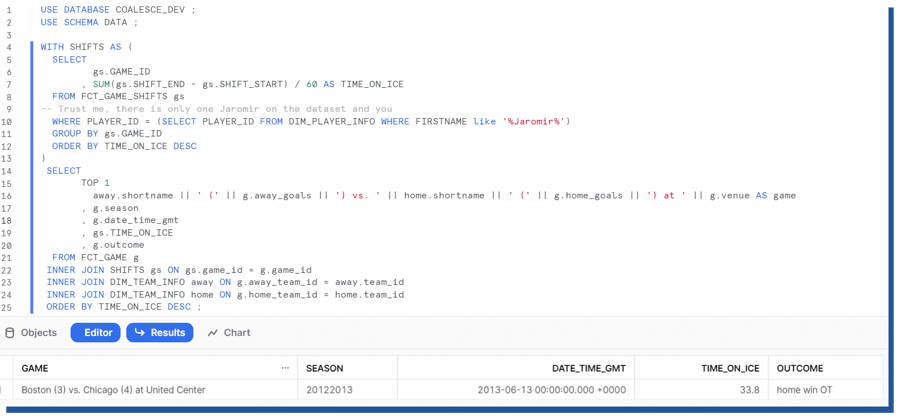 Figure 28. Testing out tables created by Coalesce
What happened at that game? Well, that was the Stanley Cup finals which Jaromir had the pleasure of attending after 21 years for his last Cup win and as you can see from the video clip he was still unstoppable, almost changing the game outcome over overtime.
Enjoyed the article? You should then consider working with us! We are constantly looking for Data engineers and Data Architects to join our kick-ass bunch of data troops! Read more about us and apply👇