Written by —

Written by —
INTRODUCTION
Recently, the advent and improvements in language models, especially with the likes of ChatGPT, have opened many opportunities for developers and businesses alike. We've been at the forefront of this wave, diligently crafting various ChatGPT demo applications that not only showcase its prowess but also its adaptability to different scenarios. See some of our previous blogs and posts here:
COLLABORATING WITH CHATGPT TO GENERATE A DATA WAREHOUSE
USING AI TO WRITE SQL AND TERRAFORM CODE
However, while ChatGPT alone is a powerful tool, when it comes to real-world applications, particularly in business contexts, having a responsive chatbot isn't enough. The true essence of a valuable AI-driven chat system is its ability to pull in and make sense of real-time or near-real-time company data. This data could be anything from customer feedback, product information, recent business process transactions, you name it. Integrating this vast reservoir of data with ChatGPT is where the real magic happens. By doing so, the chatbot can provide answers that are not just factually accurate but also contextually relevant.
Enter Vector databases. These tools allow us to retrieve information from a vast dataset based on similarity or relevance to a given query. Imagine asking your ChatGPT, "What are the most recent reviews of our latest product?" or “How would you summarize our feedback in market x for product category y, please provide z positive and negative aspects” and having it not just generate a generic answer but pull in actual customer reviews from your database. That's the potential a combination of ChatGPT and Vector databases offers. This is currently needed as the context length of current models in their current state is not sufficient to fit all the relevant information as the background information to the models. And even if we could there are indications that the models do not remember that well their history but tend to focus more at the beginning and at the end of queries. These kinds of systems can then be enhanced even more with tools like Microsoft's autogen or Langchain agents but maybe more on those later blogs.
In this blog, we delve into how one can seamlessly build a RAG solution by integrating a vector database with ChatGPT. And the cherry on top? We demonstrate how you can build an interactive demo UI using Gradio with less than 300 lines of code. Let's hop on this exciting journey!y – first up a quick video to give you an idea!
Terms Explained
Retrieval Augmented Generation (RAG)
RAG combines knowledge retrieval with sequence-to-sequence models, enabling enriched, context-aware responses by leveraging external databases like ChromaDb. Retrieval solution might be a combination of different solutions but for this demo, we chose to show how one can use dense embedding-based methods with sentence-transformer models but in real-world scenarios, retrieval can be more complex and need to be carefully evaluated. One great resource to study these methods is James Briggs's YouTube channel which I highly recommend.
Benefits of Using RAG as part of your chat solution:
- Personalized Responses: Tailor's content is based on company-specific data.
- Enhanced Automation: Makes AI tasks consider internal data constraints.
- Knowledgeable AI Models: Offers informed and domain-specific interactions.
- Business Adaptability: Flexibly integrates with proprietary databases for specialized needs.
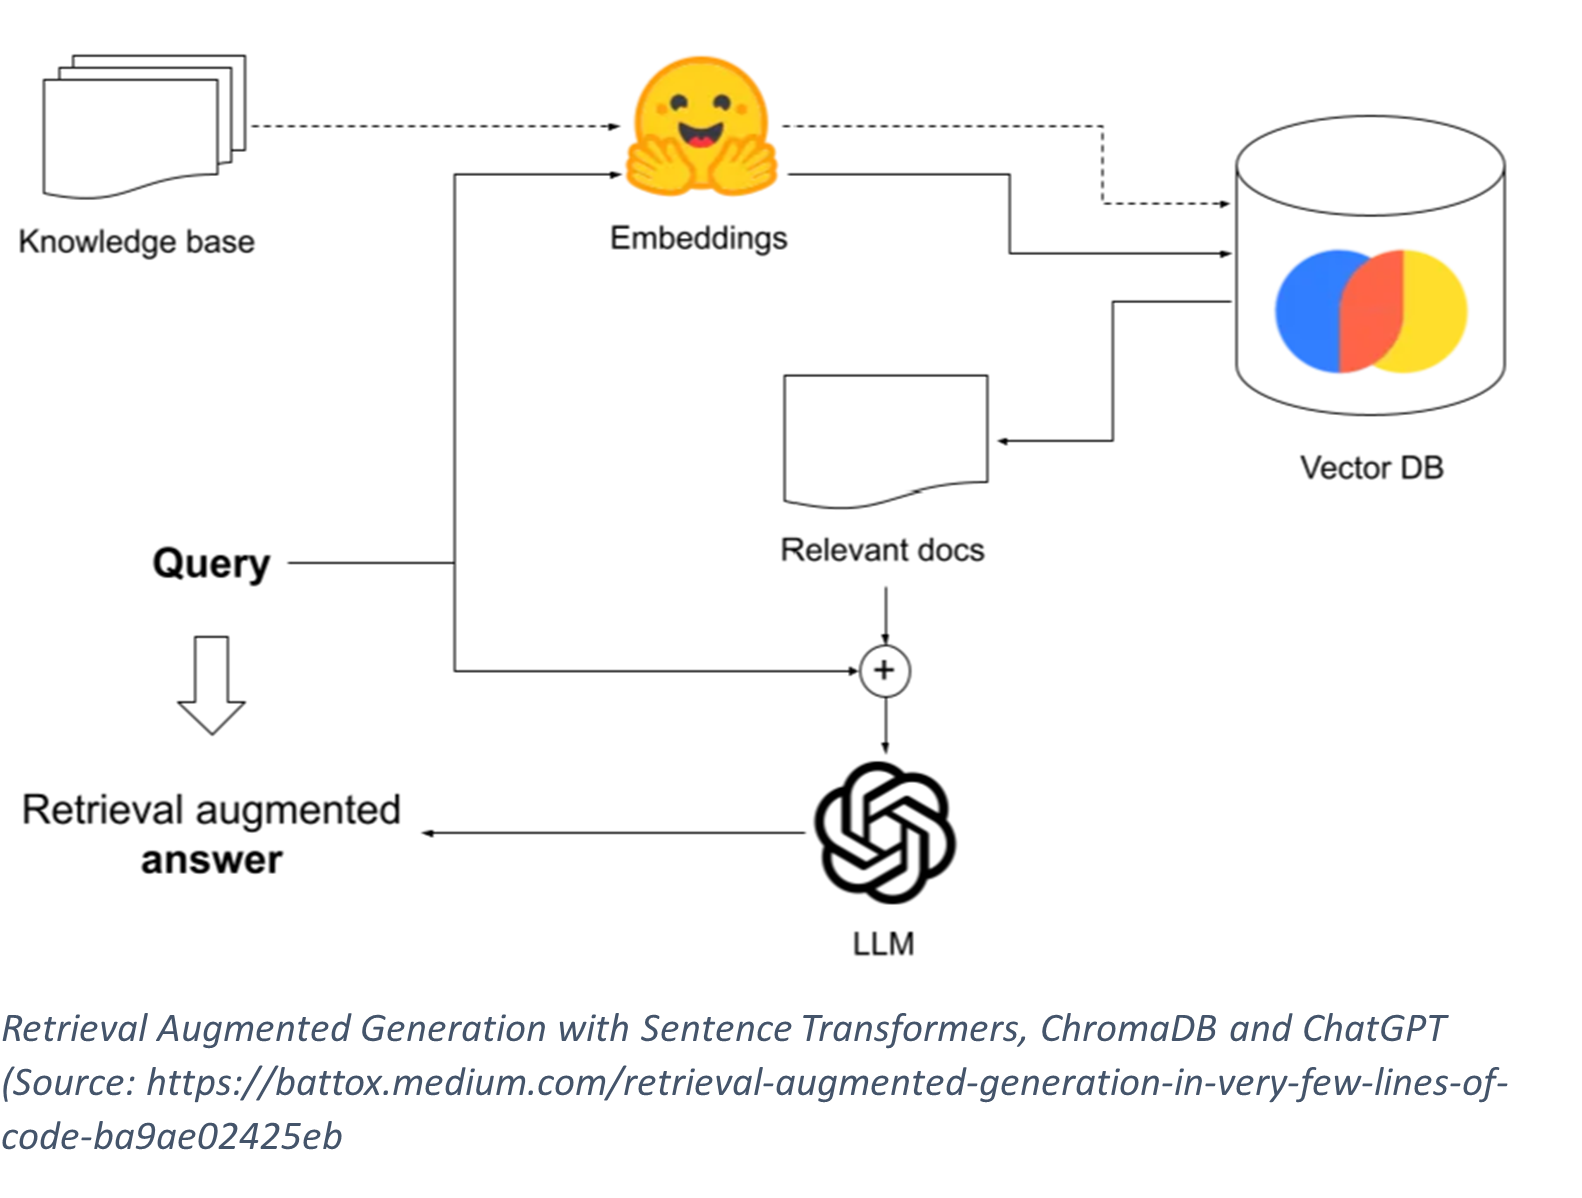
Vector Databases
Vector databases are specialized storage systems designed to handle multi-dimensional data, enabling efficient searches in large-scale embeddings. There are many options for Vector Databases but for this tutorial, I chose ChromaDB due to its easy-to-use Python library as well as its good integration with sentence transformers that provide us a convenient way to transform text into meaningful vector representations that we can later use to retrieve relevant data. Other great options include Pinecone, Qdrant, and Weaviate. More info about Chromadb can be found here: https://www.trychroma.com/
Gradio
Gradio is a brilliant tool designed to bridge the gap between machine learning models and end-users. Using Gradio developers can swiftly transform models into interactive web demos, accelerating the deployment process and enhancing user engagement. Gradio is also tightly integrated to Huggingface and their Spaces service where users can share, either publicly or privately, different demos and ML applications. We have used Gradio in addition to Streamlit internally to build and share some of our demos.
What Gradio Enables:
- Rapid Prototyping: Instantly create UIs for ML models without extensive frontend coding.
- Interactive Demos: Allow users to interact with models, feeding in inputs and viewing outputs.
- Cross-Model Compatibility: Supports machine learning frameworks like TensorFlow, PyTorch, and more.
- Customizability: Tailor the look and feel of the interface based on project requirements.
- Sharing and Deployment: Easily share demos with peers or deploy them for broader audiences.
CONCLUSION
Retrieval Augmented Generation (RAG) has emerged as a potent method, bridging the gap between large language models (LLMs) and specific data which is pivotal for resolving business-centric challenges. Through the process of embedding with sentence transformers, we've showcased how data can be retrieved from Chromadb to answer specific questions. However, it's important to note that in real-world search scenarios, an amalgamation of methods, encompassing keyword-based strategies and other advanced techniques, often complement embeddings to deliver optimal results.
This demonstration has primarily centered around the construction of a test tool using ChromaDB, Gradio, and ChatGPT. Such tools, while they may appear elementary at first glance, are immensely beneficial. They provide a hands-on approach to understanding complex AI systems and allow users to interact directly with the technology. By offering a tangible interface, these tools can unveil hidden patterns, demonstrate the model's capabilities, and expose areas of improvement. These insights gained are not just technical but also strategic, helping businesses make informed decisions about implementing and scaling AI solutions in real-world applications. It is thus important for businesses to start incubating such straightforward user interfaces internally.
If you're a developer who wants to dive a bit deeper, keep reading. You can also find the up-to-date code and demo on Hugging Face. Please note that the OpenAI API key field is of type password and won't be logged anywhere. If you would prefer to run the demo locally, you can just git clone the Huggingface space as it is also a git repository, then setup your environment from requirements.txt and run then run the app with the command "python app.py"
Setting Up the Environment
Before diving into the actual development process, it's essential to establish a robust and consistent development environment. This not only ensures smooth project execution but also minimizes potential discrepancies that might arise from varying setups.
For this tutorial, we'll employ the versatility of Conda. Conda is an open-source package and environment management system that allows users to run different versions of libraries and even Python itself in isolated environments.
Steps to Set Up:
1. Initialize a Conda Environment: Begin by setting up a dedicated Conda environment for our project, ensuring there's no interference from other libraries or projects. First, install the Anaconda/Miniconda version for your OS. Miniconda, which I used, can be found here. Remember to add a conda to your PATH so we can use it conveniently from CLI then do the following: conda create --name your_env_name
2. Integrate pip with Conda: While Conda itself is powerful, sometimes you might need libraries that are available through pip. To ensure seamless compatibility, install pip within the Conda environment:
conda activate your_env_name

conda install pip python=3.9
3. Install libraries: With pip now integrated, proceed to install the necessary libraries for our project:
pip install chromadb==0.4.9 gradio==3.42.0 openTSNE==1.0.0 openai==0.28.0 pandas==2.1.0 sentencepiece==0.1.99 sentence-transformers==2.2.2
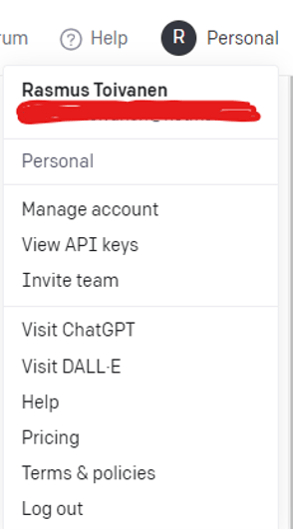
4. Set Up OpenAI API Key: To utilize ChatGPT for our interactive bot, it's imperative to authenticate our application. Set up the OpenAI API key as an environment variable, ensuring secure and direct access without hardcoding the key. Login to https://platform.openai.com/ and then go to top right under View API keys you can create and retrieve api keys. Also, I suggest you create some limits to your API key usage to play it safe.
Then once you have retrieved your API key, export it so we can later retrieve it from environmental variables in our Python code:
export OPENAI_API_KEY='your_openai_api_key'
Summary of UI Tabs and Usage
Tab 1: Uploading Data
This tab allows the user to upload a CVS file. The CVS file should contain a single piece of information. This could be a chapter from some documentation. Splitting these information pieces into meaningful batches is a task outside of the scope of this demo. Here we will use some news headlines. Once we upload the CVS the content of the file is then displayed in a table format.
Tab 2: Embedding and Visualization
The purpose of this tab is to embed textual data into a semantic space (using ChromaDB) and then visualize the embeddings in a 2D space (using t-SNE). On this tab, we can also input test strings as queries and see how close to relevant information the queries are to get a hunch on how well the embedding and retrieval methods are working. There are also options to change some parameters like the embedding model (It is important to select the appropriate model depending on your language, accuracy, and latency requirements). This functionality can be summarized as follows:
- Column Selection: A dropdown list to choose which column of the CVS to use for embeddings.
- Embedding Model & Similarity Metric Dropdowns: Choose a sentence transformer model for embeddings and the metric (cosine or l2) for similarity calculations.
- Embedding Button: When clicked, this inserts or updates the embeddings in the ChromaDB based on the selected column's data.
- Show Embeddings Button: Calculates 2D representations of embeddings using t-SNE and shows a scatter plot.
- Test String Textbox: Lets the user input a test string.
- Calculate 2D Representation Button: Visualizes where the given test string lies in the 2D scatter plot of embeddings.
Tab 3: Chatbot Interaction
In this tab, users can interact with the ChatGPT model, which uses historical messages and contextual information to respond. This means that we input questions and expect to get meaningful information from the documents stored in Chromadb. Here is the functionality summarized. See it in action in the video.
- System Prompt: A textbox where users or developers can input a system message to ChatGPT to steer conversation and style.
- ChatGPT Model Dropdown: Selection of the ChatGPT model version to use.
- Temperature Slider: Adjusts the randomness of the ChatGPT model's outputs.
- Max Tokens Slider: Limits the maximum length of the ChatGPT model's output.
- Chatbot UI: An interactive chat interface for users to chat with ChatGPT.
- Clear Button: Clears the chat history.
- Message History Display: This shows the message history between the user and ChatGPT.
Code explanations tab by tab
Tab 1: Uploading Data
UI Elements
############# TAB 1 ##########################
with gr.Tab("Upload data"):
    upload_button = gr.UploadButton(label="Upload csv", file_types = ['.csv'], file_count = "single")
    table = gr.Dataframe(type="pandas", max_rows='20', overflow_row_behaviour='paginate', interactive=True)
On the first tab, we have predefined just 2 simple components. An upload button and pandas dataframe will hold the data once we upload a CVS.
Functions
def process_csv_text(temp_file):
    if isinstance(temp_file, str):
      df = pd.read_csv(StringIO(temp_file))
    else:
      df = pd.read_csv(temp_file.name, header='infer', sep=',')
    print(df)
    return df, gr.Dropdown.update(choices=list(df.columns))
process_CVS_text is the function that processes the uploaded CVS file. It checks whether the uploaded file is a string (possibly raw CVS content) or a file object. Based on this, it reads the data into a Pandas DataFrame to a variable called df.
The function then updates the choices for the dropdown menu in Tab 2 with the columns from the uploaded CVS.
upload_button.upload(fn=process_csv_text, inputs=upload_button, outputs=[table, cols], api_name="upload_csv")
Finally, you can find the upload_button functionality that is connected to the processing function using Gradio's upload() method. When a user uploads a CVS, the process_CVS_text function is called, and the resulting dataframe is displayed in the table component, and the columns of the dataframe are set as choices in the dropdown cols (which is in Tab 2).
Tab 2: ChromaDB, TSN-E, and plots
def insert_or_update_chroma(col, table, model_name, similarity_metric, client=chroma_client):

    try:
        collection = client.create_collection(name="my_collection", embedding_function=embedding_functions.SentenceTransformerEmbeddingFunction(model_name=model_name),  metadata={"hnsw:space": similarity_metric})

    except Exception as e:
        print("collection exists")
        client.delete_collection(name='my_collection')
        collection = client.create_collection(name="my_collection", embedding_function=embedding_functions.SentenceTransformerEmbeddingFunction(model_name=model_name), metadata={"hnsw:space": similarity_metric})

    if collection:
        try:
            collection.add(
            documents=list(table[col]),
            metadatas=[{"source": i} for i in range(len(table))],
            ids=[str(i+1) for i in range(len(table))]
            )
            return "Embedding calculations and insertions successful"

        except Exception as e:
            return "Error in embedding calculations"
1. Insert_or_update_chroma function:
This function creates a collection in Chroma (or updates it if it already exists) and adds documents to it based on a specified column from the uploaded data.
-
Inputs:
-
col: The column name from the dataset (CVS) to be used.
-
table: The dataframe/table to source documents from
-
model_name: The model to be used for embeddings.
-
similarity_metric: Defines the space for the hnsw.
-
client: The interface to communicate with Chroma, defaults to chroma_client.
-
-
Output:
-
A string message indicating success or failure.
-
def show_fig():
    collection = chroma_client.get_collection(name="my_collection")
    embeddings = collection.get(include=['embeddings', 'documents'])

    df = pd.DataFrame({
        'text': embeddings['documents'],
        'embedding': embeddings['embeddings']
    })

    # Extract embeddings and perform t-SNE
    embeddings_np = np.array(df['embedding'].tolist())
    tsne = TSNE(n_components=2, random_state=42)

    transformed = tsne.fit(embeddings_np)
    #transformed = tsne.fit_transform(embeddings_np)

    # Add the transformed values back to the dataframe
    df['tsne_x'] = transformed[:, 0]
    df['tsne_y'] = transformed[:, 1]

    fig = px.scatter(df, x='tsne_x', y='tsne_y', hover_name='text')
    return fig, transformed
2. show_fig function:
Fetches embeddings and documents from the collection and visualizes them using t-SNE in 2D.
def show_test_string_fig(test_string, tsne, model_name, similarity_metric):
    collection = chroma_client.get_collection(name="my_collection", embedding_function=embedding_functions.SentenceTransformerEmbeddingFunction(model_name=model_name))

    collection.add(
    documents=[test_string],
    metadatas=[{"source": 'test'}],
    ids=['test_sample']
    )

    embeddings = collection.get(include=['embeddings', 'documents'])

    # Sample dataframe (replace this with your dataframe)
    df = pd.DataFrame({
        'text': embeddings['documents'],
        'embedding': embeddings['embeddings']
    })

    collection.delete(ids=["test_sample"])


    df = pd.DataFrame({
        'text': embeddings['documents'],
        'embedding': embeddings['embeddings'],
        'set': ['orig' if document != test_string else 'test_string' for document in embeddings["documents"]]
    })

    # Extract embeddings and perform t-SNE
    embeddings_np = np.array(df['embedding'].tolist())
    transformed = tsne.transform(embeddings_np)

    # Add the transformed values back to the dataframe
    df['tsne_x'] = transformed[:, 0]
    df['tsne_y'] = transformed[:, 1]

    fig = px.scatter(df, x='tsne_x', y='tsne_y', hover_name='text', color='set')
    return fig, tsne
3. show_test_string_fig function:
-
This function is like show_fig but it adds a test string to the collection, retrieves its embedding, and plots it alongside the other embeddings to visualize its position in the embedding space.
     ############# TAB 2 ##########################
    with gr.Tab("Select Column and insert embeddings to ChromaDb"):

        with gr.Row():
            gr.Markdown("<br>")
        with gr.Row():
            cols = gr.Dropdown(choices=['text_column_1_placeholder'], label='Dataframe columns')


        with gr.Row():
            gr.Markdown("<br>")
        with gr.Row():
            with gr.Column():
                embedding_model = gr.Dropdown(value='all-MiniLM-L6-v2',choices=['all-MiniLM-L6-v2', 'intfloat/e5-small-v2', 'intfloat/e5-base-v2', 'intfloat/e5-large-v2','paraphrase-multilingual-MiniLM-L12-v2', 'intfloat/multilingual-e5-small', 'intfloat/multilingual-e5-base', 'intfloat/multilingual-e5-large', ], label='Embedding model to use')
            with gr.Column():
                similarity_metric = gr.Dropdown(value='cosine',choices=['cosine', 'l2'], label='Siimilarity metric to use')
        with gr.Row():
            gr.Markdown("<br>")
        with gr.Row():
            embedding_button = gr.Button(value="Insert or update rows from selected column to embeddings db")
            text = gr.Textbox(label='Process status for Chroma', placeholder='This will be updated once you click "Process status for Chroma"')

        with gr.Row():
            gr.Markdown("<br>")
            gr.Markdown("<br>")
        with gr.Row():
            show_embeddings_button = gr.Button(value="Calculate 2d values from embeddings and show scatter plot")
            embeddings_plot = gr.Plot()
        with gr.Row():
            tsne = gr.State(value=None)
            test_string = gr.Textbox(label='test string to try to embed', value="Insert test string here")
        with gr.Row():
            calculate_2d_repr_button = gr.Button(value="See where text string is in 2d")
            embeddings_plot_with_text_string = gr.Plot()
 # TAB 2 (CHROMA + PLOT) Interactive elements:
    embedding_button.click(insert_or_update_chroma, inputs=[cols, table, embedding_model, similarity_metric], outputs=[text])
    show_embeddings_button.click(show_fig, inputs=[], outputs=[embeddings_plot,tsne])
    calculate_2d_repr_button.click(show_test_string_fig, inputs=[test_string, tsne, embedding_model, similarity_metric], outputs=[embeddings_plot_with_text_string, tsne])
Tab 3: ChatGPT Chat UI and functions
def user(user_message, history):
        return "", history + [[user_message, None]]
1. user function:
-
Inputs the user's message and appends it to the chat history.
-
Outputs the updated history.
 def bot(history, messages_history, embedding_model, system_prompt, temperature, max_tokens, chatgpt_model):
    user_message = history[-1][0]


    bot_message, messages_history = ask_gpt(user_message, messages_history, embedding_model, system_prompt, temperature, max_tokens,chatgpt_model)
    messages_history += [{"role": "assistant", "content": bot_message}]
    history[-1][1] = bot_message
    return history, messages_history, str(messages_history)
2. bot function:
-
-
Takes in the user's message and current history, and returns the bot's response.
-
Internally, it leverages the ask_gpt function to interact with the GPT model.
-
def retrieve_similar(prompt,embedding_model, client = chroma_client):
    # retrieve_chromadb x similar questions and append to context

    collection = collection = client.get_collection(name="my_collection", embedding_function=embedding_functions.SentenceTransformerEmbeddingFunction(model_name=embedding_model))


    results = collection.query(
    query_texts=prompt,
    n_results=10
    )
    additional_context = ''
    for i, document in enumerate(results['documents'][0]):
        if i == 0:
            additional_context = 'Information: \n' + str(i+1) + '. ' + document
        else:
            additional_context = additional_context + '\n' + str(i+1) + '. ' + document


    prompt_with_context = additional_context + '\nQuestion: ' + prompt

    return prompt_with_context
def ask_gpt(message, messages_history, embedding_model, system_prompt, temperature, max_tokens, chatgpt_model):
    if len(messages_history) < 1:
        messages_history = [{"role": "system", "content": system_prompt}]
    message = retrieve_similar(message, embedding_model)
    messages_history += [{"role": "user", "content": message}]
    print(messages_history)
    response = openai.ChatCompletion.create(
        model=chatgpt_model,
        messages=messages_history,
        temperature=temperature,
        max_tokens=max_tokens
    )
    return response['choices'][0]['message']['content'], messages_history
3. ask_gpt function:
-
-
Interacts with the GPT model using OpenAI's API.
-
Before sending the user's message to GPT, it augments the message with similar queries from Chromadb using retrieve_similar.
-
Messages to the model are structured with roles (system, user) and content.
-
def init_history(messages_history, system_prompt):
    messages_history = []
    messages_history += [{"role": "system", "content": system_prompt}]
    msg_log = gr.Textbox.update(value="Message history will be visible here")
    system_prompt = gr.Textbox.update(value="You are AI assistant that provides helpful answers based on the information given to you", label='Insert system message here')
    return messages_history, system_prompt, msg_log
4. init_history function:
-
-
Initializes the chat with a system prompt and sets the initial state for the chat interface.
-
5. retrieve_similar function (Defined in Tab 2 functions):
-
-
This function (also present in Tab 2) queries Chromadb for similar questions to the provided prompt, which are then appended to the chat context to aid GPT in understanding the user's query better.
-
    with gr.Tab("Chat"):
        gr.Markdown("""ChatGPT ChatBot with Gradio and OpenAI""")
        with gr.Row():
            system_prompt = gr.Textbox(value="You are AI assistant that provides helpful answers based on the information given to you. Please read the question carefully and only about the information that is relevant to the answer.", label='Insert system message here')
            chatgpt_model = gr.Dropdown(choices=["gpt-3.5-turbo", "gpt-3.5-turbo-0301", "gpt-3.5-turbo-0613"], value='gpt-3.5-turbo',label='ChatGPT model to use', interactive=True)
            temperature = gr.Slider(minimum=0.0, maximum=1.0, step=0.05, value=0.0, label='temperature')
            max_tokens = gr.Slider(minimum=10, maximum=600, step=10, value=100, label='Max tokens')
        with gr.Row():
            chatbot = gr.Chatbot(label='ChatGPT Chat')
            state = gr.State([])
        with gr.Row():
            msg = gr.Textbox()
        with gr.Row():
            clear = gr.Button("Clear")
        with gr.Row():
            msg_log = gr.Textbox("Message history will be visible here", label='Message history')
    # TAB 3 (CHAT) Interactive elements:
    msg.submit(user, [msg, chatbot], [msg, chatbot], queue=False).then(
        bot, [chatbot, state, embedding_model, system_prompt, temperature, max_tokens, chatgpt_model], [chatbot, state, msg_log]
    )
    clear.click(lambda: None, None, chatbot, queue=False).success(init_history, [state, system_prompt], [state, system_prompt, msg_log])
Intrigued? You can read more about our culture and promises here. To join our kick-ass band, just click below 👇